
Home Security - Lesson 4: Home Fire Safety Essentials
When we think about protecting our homes, we often picture intruders, burglars, or worst-case home invasion scenarios. But the truth is, one of the most common and devastating home emergencies doesn’t come from outside your walls, it starts inside.
Home Fire Statistics You Should Know:
A home fire is reported every 89 seconds in the United States.
Over 350,000 home fires occur each year, according to the National Fire Protection Association (NFPA).
Cooking equipment is the leading cause of home fires, followed by heating equipment and electrical malfunctions.
3 out of 5 home fire deaths occur in homes without working smoke alarms or with alarms that were non-functional due to dead batteries or age.
The average time to escape a house fire has dropped from 17 minutes to under 3 minutes due to modern materials burning faster and hotter.
These aren’t just numbers, they’re warnings. You’re far more likely to face a house fire than a break-in, and yet most people don’t check their detectors, inspect their fire extinguishers, or plan for fire-related emergencies.
In the following sections, we’ll cover:
The critical difference between smoke alarms and carbon monoxide detectors
Why CO detectors expire every 5-7 years and how to test yours
Smart placement of fire extinguishers (and how many you need)
The value of products like the Prepared Hero fire blanket
How to build layered defense, not just from intruders, but from the elements within your own home
Lesson 1
A Comprehensive Guide to Smoke-Fire-CO Alarms
Understanding Types, How They Work, and What to Choose
Smoke alarms are one of the most critical life-saving tools in your home. But not all smoke alarms are created equal. Understanding the different technologies such as ionization, photoelectric, dual-sensor, hard-wired, and monitored systems, can help you make the best choice for your safety and your environment.
Types of Smoke Alarms
Ionization Smoke Alarms
How They Work: Ionization alarms contain a small amount of radioactive material (Americium-241) placed between two electrically charged plates. This ionizes the air, creating a small, steady electrical current. When smoke particles enter, they disrupt this current, triggering the alarm.
Best For: Fast-flaming fires (e.g., paper, grease, or gas fires)
Pros:
Typically faster at detecting open flame fires
Often less expensive
Cons:
Slower to detect smoldering fires (like from a couch or electrical short)
Prone to false alarms from steam or cooking vapors
Contains radioactive material (safe during use, but needs proper disposal)
Performance can degrade at higher elevations
Ionization at High Altitudes
Ionization detectors rely on the movement of ionized particles in the air. At high altitudes, reduced air pressure and oxygen density impair this process, leading to decreased sensitivity and potentially delayed or missed alarms.
Performance Thresholds:
0–3,000 ft: Normal function
3,000–5,000 ft: Slight reduction
5,000–8,000 ft: Noticeable performance drop
8,000+ ft: Significant impairment
Research Findings:
UL and NIST have documented reduced responsiveness at high elevations
FAA studies found ionization units struggled in low-pressure environments
If you live above 5,000 feet, ionization alarms should not be your primary form of smoke detection.
2. Photoelectric Smoke Alarms
How They Work: These use a light beam and a sensor inside a chamber. When smoke enters, it scatters the light, which hits the sensor and triggers the alarm.
Best For: Smoldering fires (e.g., from electrical wiring or upholstery)
Pros:
Faster detection of slow, smoldering fires
Less prone to false alarms from cooking or steam
No radioactive material
Not affected by altitude
Cons:
Slightly more expensive
May be slower to detect fast-flaming fires compared to ionization models
3. Dual-Sensor Smoke Alarms
How They Work: Combine both ionization and photoelectric sensors to detect a wider range of fire types.
Best For: Comprehensive home coverage; especially effective in multi-level homes.
Pros:
Detects both fast-flaming and slow-smoldering fires
Offers added redundancy and peace of mind
Recommended by the NFPA and fire safety professionals
Cons:
More expensive
Slightly larger footprint
Ionization sensor performance may be reduced at high altitudes (typically above 5,000 feet)
Contains a small amount of radioactive material (Americium-241); may require special disposal
Hard-Wired Smoke Alarm Systems
What They Are: These alarms are connected directly to your home's electrical system and usually include a battery backup.
Key Features:
Interconnected: When one alarm goes off, they all sound
Reliable power source
Can include any sensor type (photoelectric, ionization, or dual)
Pros:
More reliable and consistent
Ideal for new construction or major renovations
Cons:
Requires professional installation
May be more difficult to retrofit
Building Codes: Many jurisdictions require hard-wired systems in newly built homes or remodels.
Centrally Monitored Smoke Alarm Systems
What They Are: These systems are linked to a 24/7 monitoring service (like ADT, Brinks, or Vivint). When triggered, they automatically alert emergency responders, even if you’re not home.
Key Features:
Integrated with home security systems
Often includes smoke, CO, and intrusion sensors
Smart features and mobile alerts
Pros:
Automatic emergency dispatch
Great for second homes, elderly occupants, or frequent travelers
Cons:
Monthly service fees
Requires Wi-Fi or cellular service
Higher upfront cost
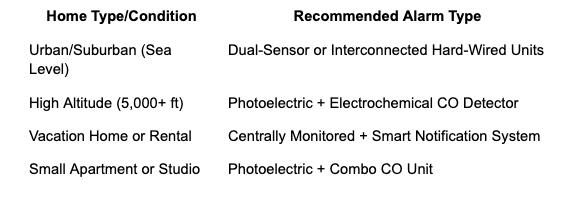
What Should You Choose?

Maintenance Tips
Test monthly using the test button
Replace batteries-Battery Backup: Even hardwired alarms may have backup batteries-replace these annually or per manufacturer’s instructions.
Vacuum and clean units regularly
Replace entire units every 10 years
Install alarms in every bedroom, hallway, and level of the home
Note: Even hardwired and centrally monitored smoke alarms have a limited lifespan-typically around 10 years. Over time, their sensors become less reliable. For optimal protection, follow manufacturer guidelines and replace the entire unit after 10 years, even if the alarm still appears to function.
Carbon Monoxide (CO) Detectors
Purpose: Detect the presence of carbon monoxide; a colorless, odorless, and deadly gas.
Common Sources:
Gas furnaces
Water heaters
Fireplaces
Gas stoves
Cars idling in garages
Types of CO Sensors:
1. Biomimetic Sensors:
Gel changes color when CO is absorbed; optical sensor detects the change
Inexpensive but slow and sensitive to humidity/temperature
Lifespan: ~2–3 years
2. Metal Oxide Semiconductor (MOS):
Uses a heated sensor that changes resistance in the presence of CO
Durable, more power-hungry, potential for false positives
Lifespan: ~5-10 years
3. Electrochemical Sensors (Most Recommended):
Chemical reaction with CO generates an electric current
Most accurate and consistent across temperature/altitude
Lifespan: ~5-10 years
Performance at Altitude:
Electrochemical sensors are stable and reliable up to ~10,000 feet
Biomimetic and MOS may have slower response times in thinner air
Always check manufacturer guidance if you live at elevation
Best Placement:
Outside sleeping areas on every level
Near attached garages or gas-burning appliances
Avoid placing near windows, vents, or fans
Combination Units:
Many modern alarms combine photoelectric smoke and electrochemical CO detection
Saves space and simplifies installation
Ensure both sensors are active and tested regularly
What Should You Choose?
Maintenance Checklist
Test all alarms monthly
Replace batteries annually (if applicable)
Replace CO detectors every 5 years
Vacuum vents occasionally to remove dust buildup
No single type of alarm is perfect for every situation. A well-rounded approach, including photoelectric or dual-sensor units, hard-wired systems, CO detectors with electrochemical sensors, and monitored services offers the best protection.
Ensure your CO detection system uses reliable technology like electrochemical sensors.
Taking the time to understand your options and installing the right system could make all the difference in an emergency.
Note: For a deeper dive on CO alarms - what ppm means, where to place detectors, and top recommended options, see my full guide: Carbon Monoxide Detectors 101
Battery-Operated Smoke Alarms
What They Are: These alarms operate independently using batteries and are not connected to your home’s electrical system. Available in two types:
Sealed battery units (5-year lithium battery)
Replaceable battery units (typically use 9V or AA batteries)
Key Features:
No wiring required, easy DIY installation
Available with photoelectric, ionization, or dual-sensor detection
Some models include combination CO (carbon monoxide) detectors, while others are smoke-only
Pros:
Affordable and easy to install
Ideal for existing homes, rental units, or temporary setups
Sealed battery models reduce maintenance (no battery changes)
Cons:
Not interconnected (unless using special wireless-linked models)
Requires consistent battery maintenance (for replaceable battery models)
Easier to disable, which could compromise safety
Carbon Monoxide Detection:
Combination smoke/CO alarms are available in both sealed and replaceable battery models
If purchasing smoke-only alarms, you’ll need separate CO detectors-recommended especially near sleeping areas and fuel-burning appliances
Maintenance:
Test monthly using the test button
Replace batteries (if applicable) at least once a year or when the unit chirps
Clean unit annually to remove dust buildup
Never paint over the alarm
Lifespan:
Sealed battery models: 5-year lifespan-replace the entire unit after 5years
Replaceable battery models: Also recommended to replace the entire unit after 5 years, even if it still functions
Lesson 2
Fire Extinguishers: Know What You Need and Where to Keep It
A working fire extinguisher is one of the most important, affordable, and overlooked tools in your home safety plan. It can stop a small fire before it becomes a life-altering disaster- but only if you have the right type, it’s easily accessible, and you know how to use it.
Basic Fire Extinguisher Types

Recommendation: For most homes, keep ABC extinguishers in multiple key locations, and consider a Class K extinguisher for kitchens with heavy stovetop use.
Best Places to Keep a Fire Extinguisher in Your Home
To be effective, extinguishers must be:
Visible
Accessible within seconds
Mounted (or placed) near, but not right next to, likely fire sources
Recommended Placement:
Kitchen: Mount near an exit, NOT directly above or next to the stove
Garage: Near workbenches, gas cans, or tool areas
Laundry Room: Especially if you use a gas dryer
Hallways: Outside bedrooms or living areas
Near Fireplaces or Wood Stoves
Each floor of your home, including the basement
Pro Tip: In a fire, you want to be able to grab the extinguisher and have a clear escape route behind you- never place it in a dead-end or cornered space.
What About Vehicle Fire Extinguishers?
Recommended to use a 2.5 lb. ABC-rated model for cars and trucks
Should be securely mounted within easy reach (e.g., under driver seat or cargo area)
Maintenance
Check pressure monthly
Replace after 10–12 years or if damaged or discharged
Recharge only if it's a rechargeable model
Fire Extinguisher Maintenance
Check pressure gauge monthly (needle should be in the green zone)
Flip or shake dry chemical extinguishers twice a year to prevent settling
Replace or recharge after every use, even partial
Professional inspection recommended every 6 years
Replace entirely after 10–12 years, even if unused
NOTE: You can store a fire extinguisher in a vehicle in the HOT Summer months, but it needs to be rated for automotive/high-temp use, mounted securely, checked monthly, and replaced more often than one kept indoors. If you want maximum reliability in extreme heat, use a high-temp-rated, clean agent model or insulate your dry chemical extinguisher.
Heat & Fire Extinguishers in Vehicles
Pressure Concerns
Most portable fire extinguishers (dry chemical, CO₂, clean agent) are pressurized between 100-195 psi.
Heat causes the gas inside to expand, which raises internal pressure.
Quality extinguishers are designed with a safety margin to handle high temperatures, often up to 120-150°F (49-65°C) for continuous exposure.
However, Arizona car interiors can hit 160-180°F in summer, exceeding that range.Risks
Pressure relief valve discharge- If the temperature gets high enough, the extinguisher may vent through the safety valve. This can render it useless when you actually need it.
Seal & hose damage- Rubber and plastic components can degrade faster in extreme heat.
Powder clumping- In dry chemical extinguishers, repeated extreme heat cycles can cause the powder to cake together, reducing effectiveness.
Best Practices for States that Experience Extreme Summer Heat
Choose the right type:
Dry chemical (ABC) is most common for vehicles, but make sure it’s rated for automotive use and tested for higher temp ranges.
Clean agent extinguishers (Halon replacement types like Halotron) handle temperature swings better but are more expensive.
Mount securely: A rolling extinguisher in a trunk can get damaged or the safety pin can fall out.
Shade & insulation: Keep it out of direct sunlight- inside a center console, under a seat, or wrapped in a thermal/fire-resistant sleeve.
Monthly check: Look at the pressure gauge; if it’s in the green, you’re good. If it’s over-pressurized or in the red, replace or service it.
Shake it periodically: For dry chemical units, a gentle shake every couple of months helps keep powder from clumping.
Manufacturer Guidance
Many brands (Kidde, Amerex) note that vehicles are a valid location for storage but excessive heat will shorten service life.
Some automotive-specific extinguishers list -40°F to +175°F as their operational range. If your model isn’t rated for those temps, replace it with one that is.
Fire Extinguisher Education: Everyone in the Home Should Know This
Having fire extinguishers in the right places is only part of the equation- knowing how to use them under stress is just as important. In an emergency, there’s no time to read instructions. Every adult (and responsible teenager) in the household should be trained on when to use a fire extinguisher and how to use it properly.
Use the PASS Method
The most widely recommended technique for using a fire extinguisher is the PASS method:
P – Pull the pin
A – Aim the nozzle at the base of the fire
S – Squeeze the handle to release the extinguishing agent
S – Sweep the nozzle from side to side at the base until the fire is out
Practice walking through these steps verbally with family members. Keep instructions near each extinguisher if possible.
When to Use a Fire Extinguisher and When Not To
Only attempt to extinguish a fire if:
The fire is small and contained (like in a trash can or pan)
You have a clear escape route
You have the right type of extinguisher
You’ve already called 911 (or had someone else do so)
Do not attempt to fight a fire if:
The fire is spreading rapidly
Smoke is filling the room
You’re unsure of the fire’s cause (e.g., electrical vs. grease)
You don’t know how to use the extinguisher confidently
Rule of thumb: If in doubt, get out. Use the extinguisher only to clear your escape route if necessary.
Make Fire Safety a Family Conversation
Walk through where extinguishers are located
Role-play scenarios (especially in the kitchen)
Include extinguisher training in your family emergency plan
Teach kids to get out, stay out, and call 911- never to fight the fire themselves
The Prepared Hero Fire Blanket: Fast, Simple Fire Suppression
Fire extinguishers are essential, but they’re not always ideal for everyone or every situation. That’s where fire blankets-like the Prepared Hero Fire Blanket-come in. These compact, easy-to-use tools provide a non-toxic, mess-free way to smother small fires fast.
What Is a Fire Blanket?
A fire blanket is made of fire-resistant fiberglass material designed to cut off a fire’s oxygen supply and smother the flames. It’s especially effective for:
Kitchen fires (grease, stovetop)
Trash can fires
Clothing fires
Candle or appliance mishaps
Unlike extinguishers, fire blankets don’t create a cloud of chemical dust, don’t expire, and require no cleanup.
Why the Prepared Hero Blanket?
The Prepared Hero Fire Blanket is a compact, budget-friendly option that’s:
Heat-resistant up to 1,100°F
Simple enough for children, seniors, or panicked users
Compact and easy to store near your stove, grill, or toolbox
Can be used to wrap around a person if their clothing catches fire
It’s a great first response tool that doesn’t replace a fire extinguisher- but complements it.
Where to Keep Fire Blankets
Kitchen: Mount one in a visible spot, within arm’s reach of the stove
Garage or Workshop: Especially near welding tools, batteries, or flammables
Near fireplaces or space heaters
Emergency kits or go-bags: Lightweight and portable for bug-out use
Bonus: In a pinch, a fire blanket can also be used to shield yourself while escaping a room with flames or extreme heat.
Teach Your Family to Use It
Using a fire blanket is simple:
Pull down on the tabs to release it from the pouch
Hold it in front of you as a shield
Gently lay it over the fire-don’t throw or flap it
Turn off the heat source (if safe to do so)
Leave it in place until the blanket and fire are completely cool
Second Way Out: Emergency Escape Ladders
A fire can make your primary exit route (like a hallway or stairwell) inaccessible within seconds. An emergency escape ladder gives you a critical second way out, especially from upper floors. Here’s how to incorporate them into your home safety plan:
Where to Keep Them
Place a ladder in every upper-floor bedroom, not just one per floor.
Store it where it’s quickly and easily accessible:
Under the bed
Inside the closet
Mounted on the wall near the window
Avoid attics or cluttered storage, speed matters in an emergency.
When to Use Them
Only use the ladder when the primary exit is blocked by smoke, heat, or flames.
Make sure the window opens fully and the drop below is safe (no obstacles, sharp fences, etc.).
Don’t use the ladder just for convenience, it’s for life-threatening situations.
Teach Your Family How to Use It
Practice deploying the ladder with your family, especially children.
Do a fire drill that includes opening the window and positioning the ladder safely.
Practice from a ground-floor window for safety, focusing on calm, deliberate movements.
Remind everyone: Once you’re out, stay out. Never re-enter a burning building.
Pro Tips
Use glow-in-the-dark tape or labels so the ladder is easy to find in the dark or smoke.
Attach a laminated instruction tag to the ladder handle for quick reference.
Show guests or babysitters where the ladder is and how to use it.
Lesson 3
Create and Practice a Home Fire Escape Plan
All the fire safety gear in the world won’t help if you or your family don’t know what to do in an emergency. Fires move fast-today’s synthetic materials and open floor plans mean you may have less than 2 minutes to escape once an alarm sounds.
A well-rehearsed fire escape plan ensures everyone in your household can react quickly and confidently.
Step 1: Map Two Ways Out
Draw a simple floor plan of your home showing all rooms, windows, doors, and potential exits.
Identify two escape routes from every room- usually a door and a window.
Make sure windows can open easily from the inside and that everyone knows how to use them.
The entire family should practice opening any emergency escape windows- especially in bedrooms.
Step 2: Designate a Safe Meeting Spot
Choose a spot outside and away from the home where everyone will gather (e.g., mailbox, neighbor’s tree, or streetlight).
Make sure the meeting place is visible, safe, and easily accessible.
Step 3: Assign Roles
Parents or adults: Account for kids, pets, or elderly household members
Older kids: Can help younger siblings exit or assist with 911 calls (if it’s safe to do so)
Make sure everyone knows not to re-enter the home under any circumstances.
Step 4: Practice the Plan (At Least Twice a Year)
Run full fire drills, including during nighttime or bad weather conditions
Practice crawling low under smoke
Simulate blocked exits and use alternative routes
Time your escape- can you get out in under 2 minutes? Make it a challenge for kids: use role-play, stopwatches, or sticker charts to reinforce learning.
Important Message for Kids: Don’t Hide- Get Outside
If there’s ever a fire in your home, it’s very important that you do not hide. Fires can be scary, and your first thought might be to hide under the bed or in a closet, but that makes it harder for firefighters to find and help you. Instead, remember this: get out and stay out. Find your way outside as quickly and safely as you can, and go to your family’s meeting spot.
Also, if you see a firefighter in full gear, a helmet, mask, and big jacket, they might look and sound a little scary. But don’t be afraid. They are there to help you and keep you safe. Even if they’re crawling or calling out your name in a funny voice, go to them; they’re heroes doing their job.
Knox Box: Secure Emergency Access for First Responders
A Knox Box (or Knox HomeBox for residences) is a heavy-duty, wall-mounted lock box that stores a key to your home. Only your local fire department or authorized EMS personnel have the master key to open it. This allows them to enter during an emergency without breaking down your door.
Why It’s Important
Faster Entry: Seconds count in a fire or medical emergency.
Avoids Property Damage: Prevents costly repairs to doors and locks.
Critical for Seniors & Special Needs: Ideal for residents who may be unable to get to the door quickly.
Security Considerations
Controlled Access: Master keys are kept under strict security by the fire department.
Tamper-Resistant: Made from hardened steel to deter break-ins.
Reported Break-Ins: Extremely rare for residential units; proper placement reduces risk further.
Best Placement
Near your primary entry, but not in plain street view.
4-6 feet from the ground for easy access by responders.
Bolted securely into masonry, brick, or other solid surfaces.
Coordination with Your Fire Department
Notify your local FD before installation, they may have placement requirements or approved models.
Keep the key inside the box updated if you change locks
Calling 911 and Marking Your Home Clearly
Call 911 immediately in any fire or life-threatening emergency, give your address first, then the nature of the emergency.
Teach all household members, including older children, how to make the call and what to say.
Clearly mark your home: House numbers should be large, reflective, and visible from the street- day and night.
This helps both the fire department and EMS find you quickly, especially in low-visibility conditions.
Pro Tip: A Knox Box paired with a well-practiced escape plan gives first responders the best possible chance to protect lives and property- even if you can’t get to the door yourself.
Fire safety doesn’t have to be complicated. With the right tools, a little preparation, and regular practice, you can protect your home and the people you love. Remember- most fires are preventable. When they do happen, being prepared makes all the difference. Teach your family, check your equipment, and review your plan. Stay alert, stay ready, and stay safe.
For more information, please see our Safest House on the Block Guide.
Affiliate Disclosure: I’ve linked to products from my Amazon Store that I personally recommend. If you purchase through these links, I may earn a small commission (at no extra cost to you). Thank you for supporting my work.