What You Need for a Safe, Productive Day at the Range
By Larry Betz | Prepared Not Paranoid https://www.preparednotparanoid.com/
The right range gear won't make you a better shooter by itself, but the wrong gear can make training harder, and unsafe. In Part 5, we covered the terms and commands. Now let's set you up with the equipment. I'll start with the two pieces of safety gear you can't skip, then walk through the gear you'll add as your training grows.
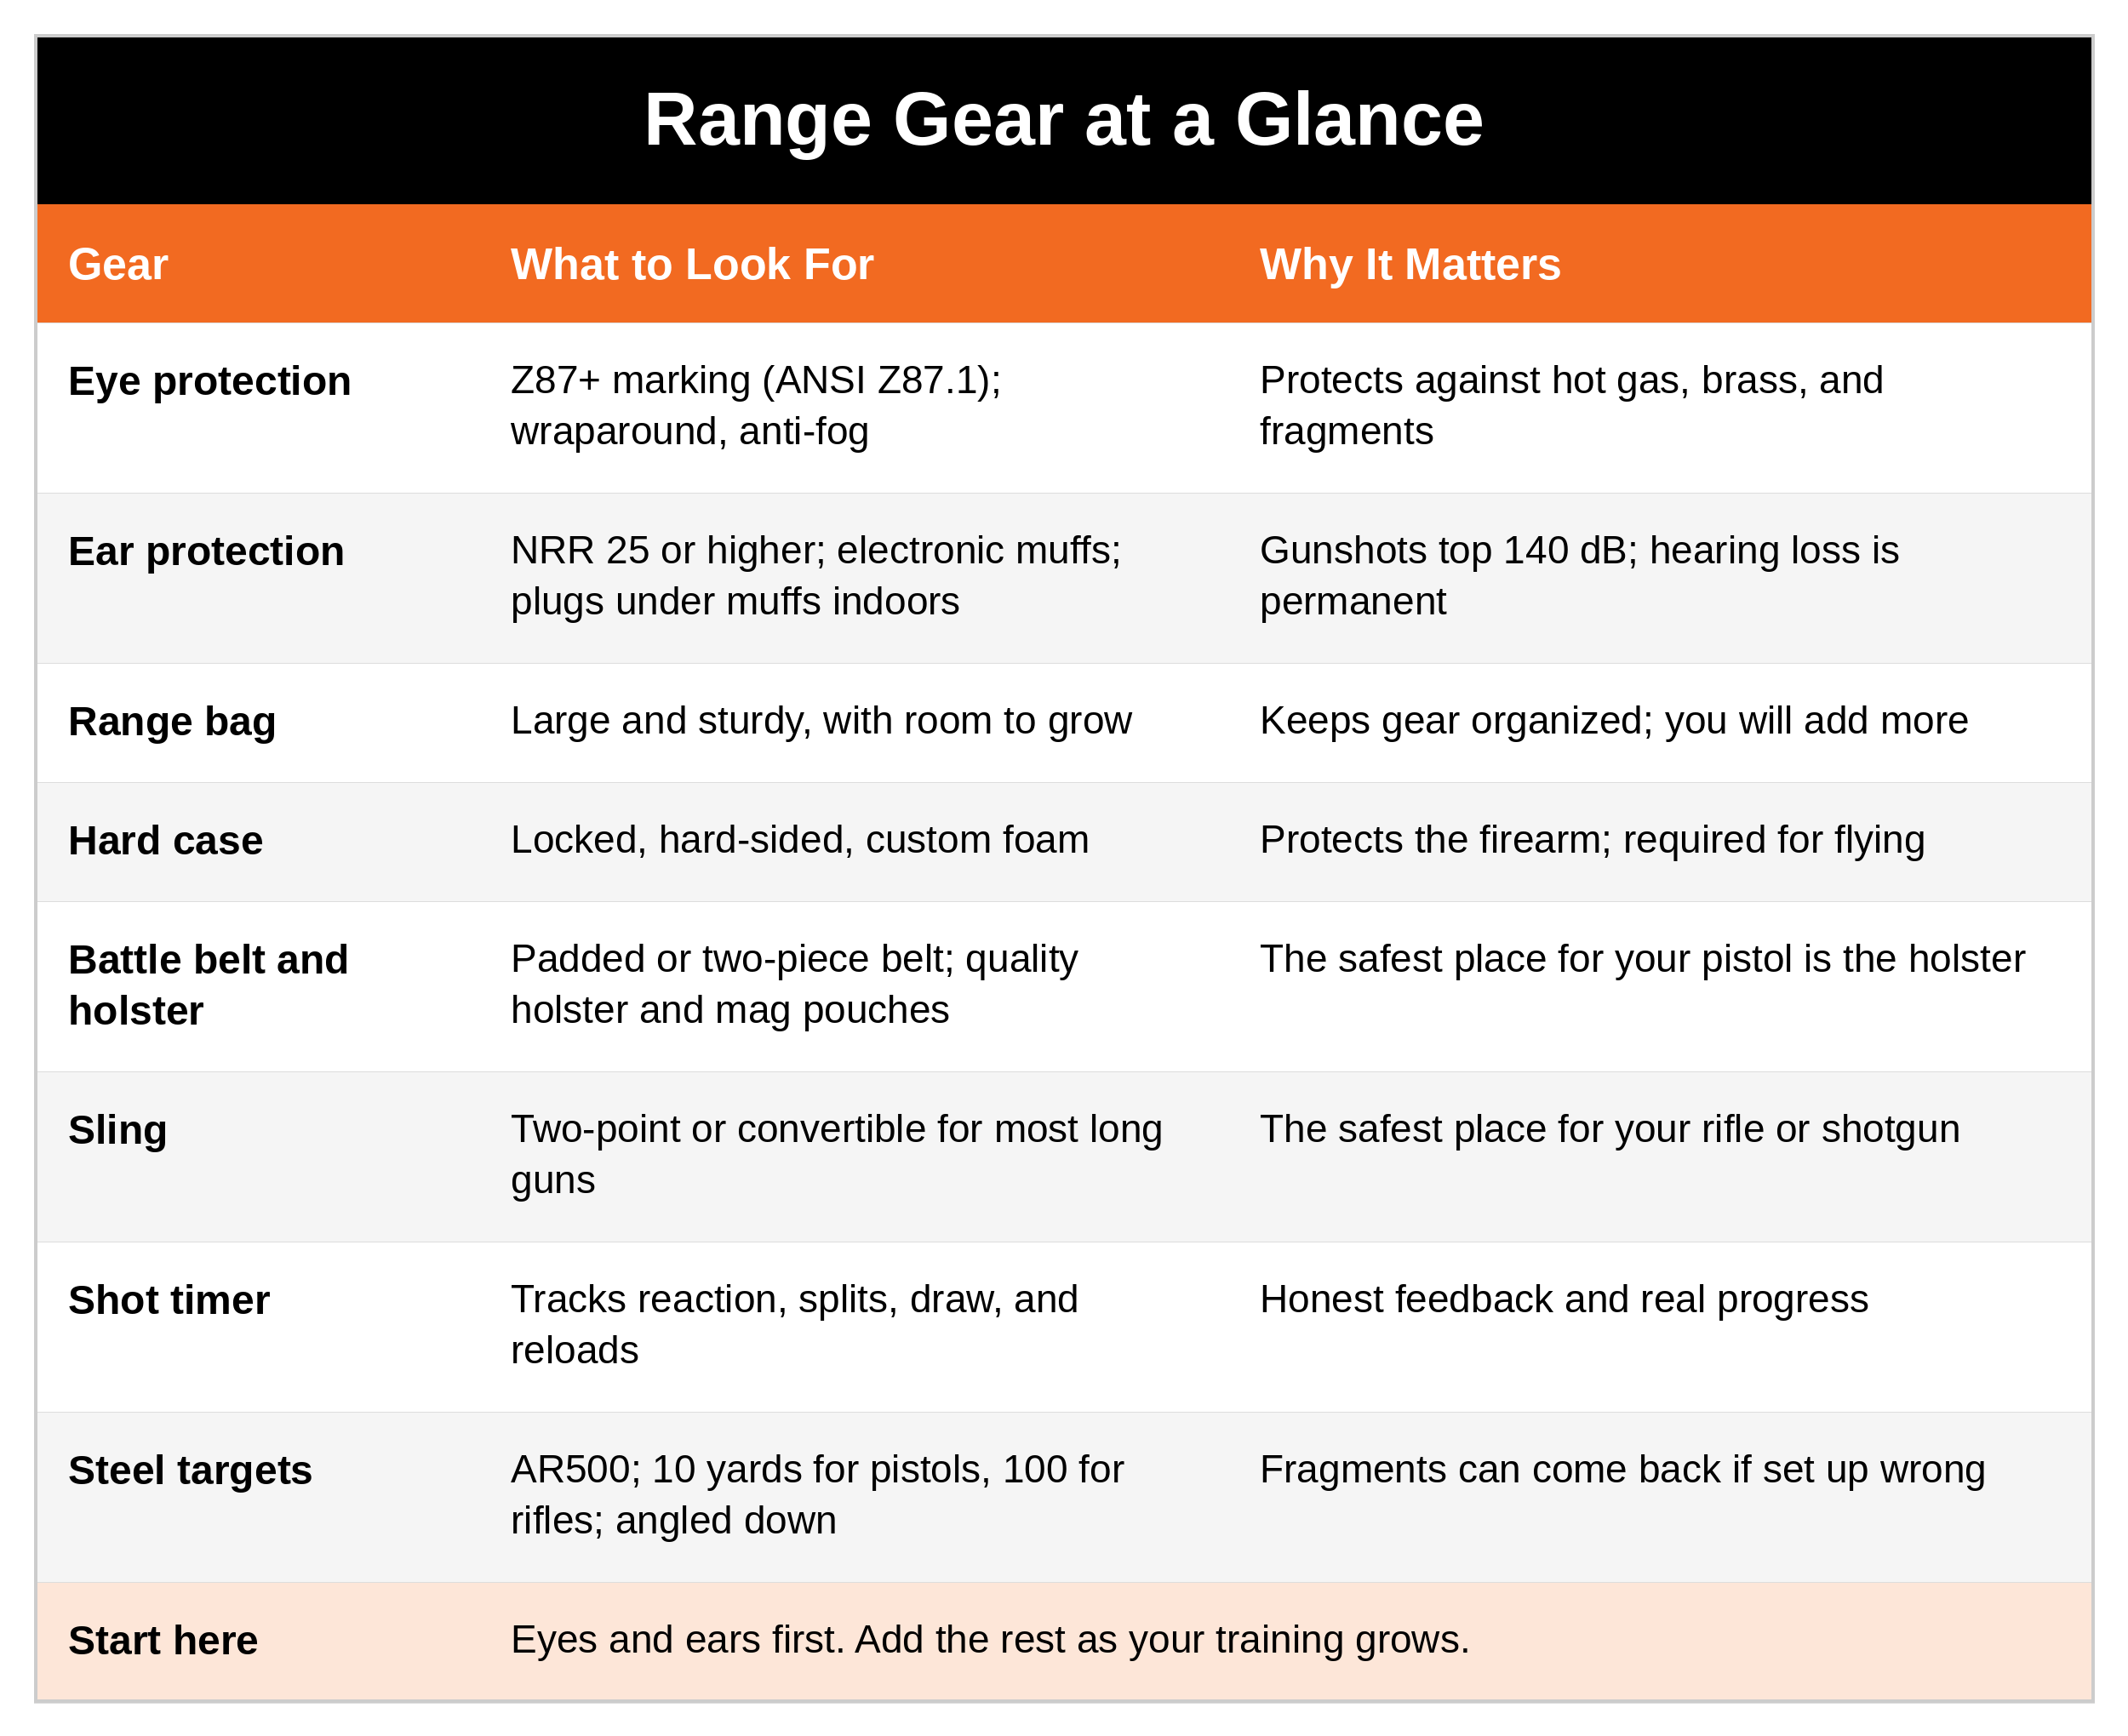
Range Gear at a Glance
If you only read one thing, read this.
Here's the short version.
Eye Protection
Hot gas, ejected brass, and fragments from targets or backstops can all hit your eyes. Good eye protection keeps them safe and helps you see clearly.
What to look for:
The ANSI Z87.1 standard. This is the most widely accepted impact-resistance rating in the U.S.
The "Z87+" marking. The plus sign means the lenses passed high-impact testing, which is what you want for shooting. Plain "Z87" may only offer basic protection.
Wraparound coverage, anti-fog coating, and UV protection for outdoor ranges. Comfort matters too, because you'll wear them for hours.
Need more protection? Look for glasses rated to MIL-PRF-32432, the military ballistic standard. They're built to handle higher-velocity impacts than ANSI Z87.1 and are common in professional and high-risk training.
Ear Protection
Gunshots commonly go past 140 decibels, loud enough to cause permanent hearing damage. Hearing loss doesn't come back, so this is one place you never cut corners.
What to look for:
NRR (Noise Reduction Rating) of 25 or higher. The higher the number, the more noise it blocks.
Double up indoors and with rifles. Wear foam earplugs under your earmuffs. Combined, they don't add up to both ratings together, but they give you roughly 5 dB more protection than the stronger one alone, which makes a real difference at an indoor range.
Electronic earmuffs. These are my strong recommendation. They let you hear normal sounds, like conversation and range commands, and shut down or compress loud sounds, usually anything above about 82 to 85 dB. You stay protected and aware.
A good seal. Ear protection only works if it fits. Adjustable muffs and foam plugs that expand to fit your ear seal best. For long days, choose something light and comfortable.
Rated to a recognized standard, such as ANSI S3.19-1974 in the U.S. (CE EN 352 if you're outside the U.S.).
Getting Your Firearm to the Range
Transport laws are different in every state. In some states, a range bag is enough. In others, your firearm must be unloaded, in a locked case, and kept separate from the ammunition. Check the laws where you live and anywhere you'll travel. The USCCA keeps a state-by-state map: https://www.usconcealedcarry.com/resources/ccw_reciprocity_map/
Your firearm is your property, and with that comes the responsibility to handle, store, and transport it safely and legally. Good transport habits also help prevent accidents, theft, and misuse.
Range Bag
No matter what your state requires, you'll want a sturdy range bag for your gear. And I'll make you a promise: the more you train, the more gear you'll own. A large bag keeps it organized.
Hard Cases
A hard case, from brands like Pelican or Condition One, protects your firearm from impact, tampering, and weather. Look for:
Tough, high-impact polymer
Foam you can customize so the firearm and accessories don't move around
Reinforced lock points for padlocks
Flying with a firearm? TSA requires it to be unloaded in a locked, hard-sided container that completely secures it, and you should be the only one with the key or combination. (TSA may ask for it to inspect the case.) We cover the full rules in Part 12. [LINK: Part 12, Traveling With a Firearm]
Biometric Safes
A biometric handgun safe opens with your fingerprint. Look for steel construction, a tamper-resistant design, and a backup way in, like a keypad or key. Some people also use a small biometric safe to transport a handgun to and from the range. Check your local laws to make sure that meets your state's transport rules. (Safe storage at home is covered in Part 11.) [LINK: Part 11, Safe Storage at Home]
Battle Belts, Holsters, and Pouches
You'll probably start at an indoor range with benches and lanes, which is perfect for learning safe handling and basic marksmanship. As your skills grow, you'll move to outdoor ranges and training classes, and that means new gear: a battle belt, magazine pouches, and a quality holster. In an open training area, the safest place for your pistol is in the holster.
If you plan to carry concealed, I strongly recommend getting comfortable with every skill (drawing, reloading, clearing malfunctions) on a battle belt first, before you add the challenge of working around everyday clothing.
Two Common Battle Belt Setups
Two-piece belt. An inner belt goes through your pants' belt loops and has Velcro on the outside. The outer belt, which holds your holster and pouches, attaches to it with that Velcro. Gear mounts with MOLLE attachments. It's streamlined and works well.
Padded battle belt. This is the one I've been very happy with. In an 8-hour class, comfort matters, and the padding makes a big difference. It also uses an inner belt woven through the padded outer belt and held with Velcro. Weaving it can be a little tricky the first time, but it's worth it.
What Goes on the Belt
Since I started training in 2018, I've tried a lot of gear, and too often I bought things that didn't perform the way I hoped. Here's what's worked for me:
Magazine pouches: High Speed Gear and G-Code, both durable with reliable retention.
Dump pouch: Maxpedition. Great for holding empty magazines and extra gear while you train.
Holsters: Comp-Tac and Safariland. You can find a holster for almost any setup.
Choose gear that helps your training, not gear that gets in the way.
Slings for Rifles and Shotguns
On an open range, the safest place for your pistol is in the holster, and the safest place for your rifle or shotgun is on a sling. There are three main types:
Single-Point Sling
Pros: Fast to switch shoulders, simple, and light. Good for short-barreled firearms.
Cons: The gun swings when it hangs, it can get uncomfortable with a heavy gun, and it's not great for running.
Two-Point Sling
Pros: Very stable across the body, adjustable for carrying and shooting, spreads the weight, and works with most long guns.
Cons: Slower to switch shoulders and may need adjusting between carrying and shooting.
Convertible Sling (Two-Point to Single-Point)
Pros: Gives you both options in one sling.
Cons: More to learn and adjust, and a little heavier because of the extra hardware.
Choosing the Right Sling
For most rifles and shotguns, a two-point or convertible sling gives you stability and comfort.
For short-barreled firearms, a single-point may move better.
At the range, a two-point is very stable. For training that involves a lot of movement, a convertible gives you flexibility.
For long days, choose a padded sling.
Two brands I trust are VTAC (Viking Tactics) and Magpul. Good models to look at include the VTAC Padded and VTAC Hybrid (two-point), the Magpul MS1 (two-point), and the Magpul MS3 Gen2 and MS4 Dual QD (convertible). Try a few configurations to find what feels right for how you'll use it.
Shot Timer
Once you can safely work your rifle from its sling and your pistol from its holster, a shot timer adds a new level to your training. It beeps to start, then records every shot.
What it measures:
Reaction time: How fast you fire after the beep
Split times: The time between shots
Draw time: From the beep to your first shot from the holster
Reload speed: How quickly you can reload under time pressure
Why it helps:
It's honest. Without a timer, it's easy to think you're faster than you are.
It tracks progress session after session, so you can see real improvement.
It shows your weak spots, like hesitation or slow reloads.
It adds a little pressure. A beep isn't real-world stress, but it gets you used to performing on the clock and keeps you focused.
Targets and Range Necessities
Many ranges provide targets and stands. Where I live, we shoot on designated land, so we bring our own gear. If that's your situation, here's the list I've built over time, whether I'm training alone or with a group.
Target stands
Cardboard targets and cardboard target backers
Paper targets
Target pasters or tape to cover holes
Large paper clips
A staple gun
Self-healing rubber targets (you'll need paint to cover the hits)
Sandbags to hold stands down in the wind
Steel Targets: Please Read Before You Shoot Steel
Steel targets are fun and give you instant feedback, but bullet fragments can come back at you if you don't set them up right. For AR500 1/2-inch steel, follow these guidelines, and always follow your target maker's instructions.
Safe Distances
Pistols: At least 10 yards (30 feet) for common pistol calibers like 9mm, .40, and .45.
Rifles: At least 100 yards. Rifles carry much more speed and energy, which can damage steel and send fragments back if you shoot too close.
Set It Up Right
Angle the target slightly downward, about 15 to 20 degrees, so fragments go into the ground, not back toward you.
Use the right ammunition. With pistols, use lead or jacketed rounds. With rifles, avoid steel-core and armor-piercing ammo, like M855 "green tip," which can damage steel. Check your target maker's ammo list.
Inspect your steel. Look for pitting, cracks, or dents. Damaged steel can send fragments in unpredictable directions. Replace it when it's worn.
Mount it securely so it doesn't swing too much.
Range Safety With Steel
Follow the four universal safety rules. [LINK: Part 4, The Four Universal Safety Rules]
Keep everyone behind the firing line, with space between shooters and spectators.
Everyone wears eye protection, not just the shooter.
Keep SCAN Running
The best gear in the world doesn't replace awareness. SCAN works at the range too: S - See your environment (who's around and where the line is), C - Create space (safe distances, especially with steel), A - Act deliberately (set up carefully, never rushed), and N - Never doubt your gut feelings (if a setup looks unsafe, fix it before anyone shoots).
What to Say
At the gun counter: "I'm new to this. What eye and ear protection would you recommend for an indoor range?"
To a friend joining you on steel: "Stay behind the line and keep your glasses on the whole time, even when you're not shooting."
To your instructor: "Before I buy a belt and holster, can I try your setup to see what works for me?"
Ask Yourself
Do my safety glasses have the Z87+ marking, and is my hearing protection rated NRR 25 or higher?
Do I know my state's rules for transporting my firearm to the range?
If I shoot steel, am I at a safe distance with the target angled down and the right ammo?
Remember
Start with eyes and ears. Everything else comes as your training grows. Buy quality gear that helps you train, follow the transport laws where you live, and treat steel targets with respect.
Get Started Today
[FREE DOWNLOAD: TBD. Suggested: Range Day Packing List, one page] [CTA: Comment or DM "KEYWORD" / or download it here: LINK]
Go Deeper
The Family Safety Toolkit. The right gear is one part of training safely. The Toolkit gives you 20 checklists covering every area of family safety and preparedness, from your home and vehicle to travel and your go bag, all for $19.99. [Get it here: https://www.preparednotparanoid.com/family-safety-toolkit]
The Family Emergency Preparedness Manual is coming soon.
Tools I recommend: The eye and ear protection, range bags, cases, belts, slings, shot timers, and targets I recommend are in my Range Essentials Amazon store. https://link.amazon/B0hxQD89P
Related reading:
Firearms and Family Safety, Part 5: Range Day Basics: Terms and Commands [LINK]
Firearms and Family Safety, Part 9: Holsters, Clothing, and Drawing From Concealment [LINK]
Firearms and Family Safety, Part 11: Safe Storage at Home [LINK]
Firearms and Family Safety, Part 12: Traveling With a Firearm [LINK]
References
American National Standards Institute (ANSI). Z87.1 standard for occupational and educational eye and face protection.
U.S. Department of Defense. MIL-PRF-32432 ballistic eyewear performance specification.
U.S. Environmental Protection Agency. Noise Reduction Rating labeling (ANSI S3.19-1974).
National Institute for Occupational Safety and Health (NIOSH). Guidance on combining hearing protection.
Transportation Security Administration. "Transporting Firearms and Ammunition." https://www.tsa.gov/travel/transporting-firearms-and-ammunition
U.S. Concealed Carry Association. State gun laws and reciprocity map. https://www.usconcealedcarry.com/resources/ccw_reciprocity_map/
AR500 Target Solutions. Steel target FAQs and safe shooting distances. https://ar500targetsolutions.com/faqs/
Disclaimer
These suggestions are intended to help you and your family build awareness, confidence, and safer decision-making habits. No safety plan, checklist, or tool can guarantee 100% protection. This article is for general informational purposes only and is not legal advice or a substitute for hands-on firearms training with a qualified instructor. Firearm transport and storage laws vary by state, so check your local laws and talk to a qualified attorney about your specific situation. Always follow your range's rules and your equipment manufacturer's instructions. Always store firearms securely and out of reach of children. Affiliate disclosure: I've linked to products from my Amazon store that I personally recommend. As an Amazon Associate, I earn from qualifying purchases, at no extra cost to you. Thank you for supporting my work.
If you are in immediate danger, get to safety and call 911.
Awareness gives you time. Time gives you options.
The prepared protector is someone who's decided that loving someone means being ready for them, not just hoping things go fine.
Prepared Not Paranoid. Protecting the Most Vulnerable Among Us.