Getting to Your Firearm Safely When It Counts
By Larry Betz | Prepared Not Paranoid https://www.preparednotparanoid.com/
Carrying a concealed firearm is only half the job. The other half is drawing from concealment safely, smoothly, and only when you truly need to. That takes the right holster, clothing that hides the gun but still lets you reach it, and a lot of slow, careful practice. In Part 8, we covered where to carry. Now we'll cover the gear, the clothes, the draw, and the reality of how fast things happen.
Choosing a Holster
A good carry holster does four things:
Covers the trigger. The trigger guard must be completely covered, every time. [LINK: Part 8, Concealed Carry Positions]
Holds the gun securely (retention), so it doesn't fall out when you run, sit, or bend over.
Is comfortable enough to wear every day. A holster you leave at home doesn't protect anyone.
Lets you get a full, firm grip on the gun before you draw.
Be honest when you evaluate your gear. If something isn't working, change it.
Holster Materials Compared
Holsters are usually made from Kydex, leather, or a hybrid of both. Each has trade-offs.
Here's how the three compare.
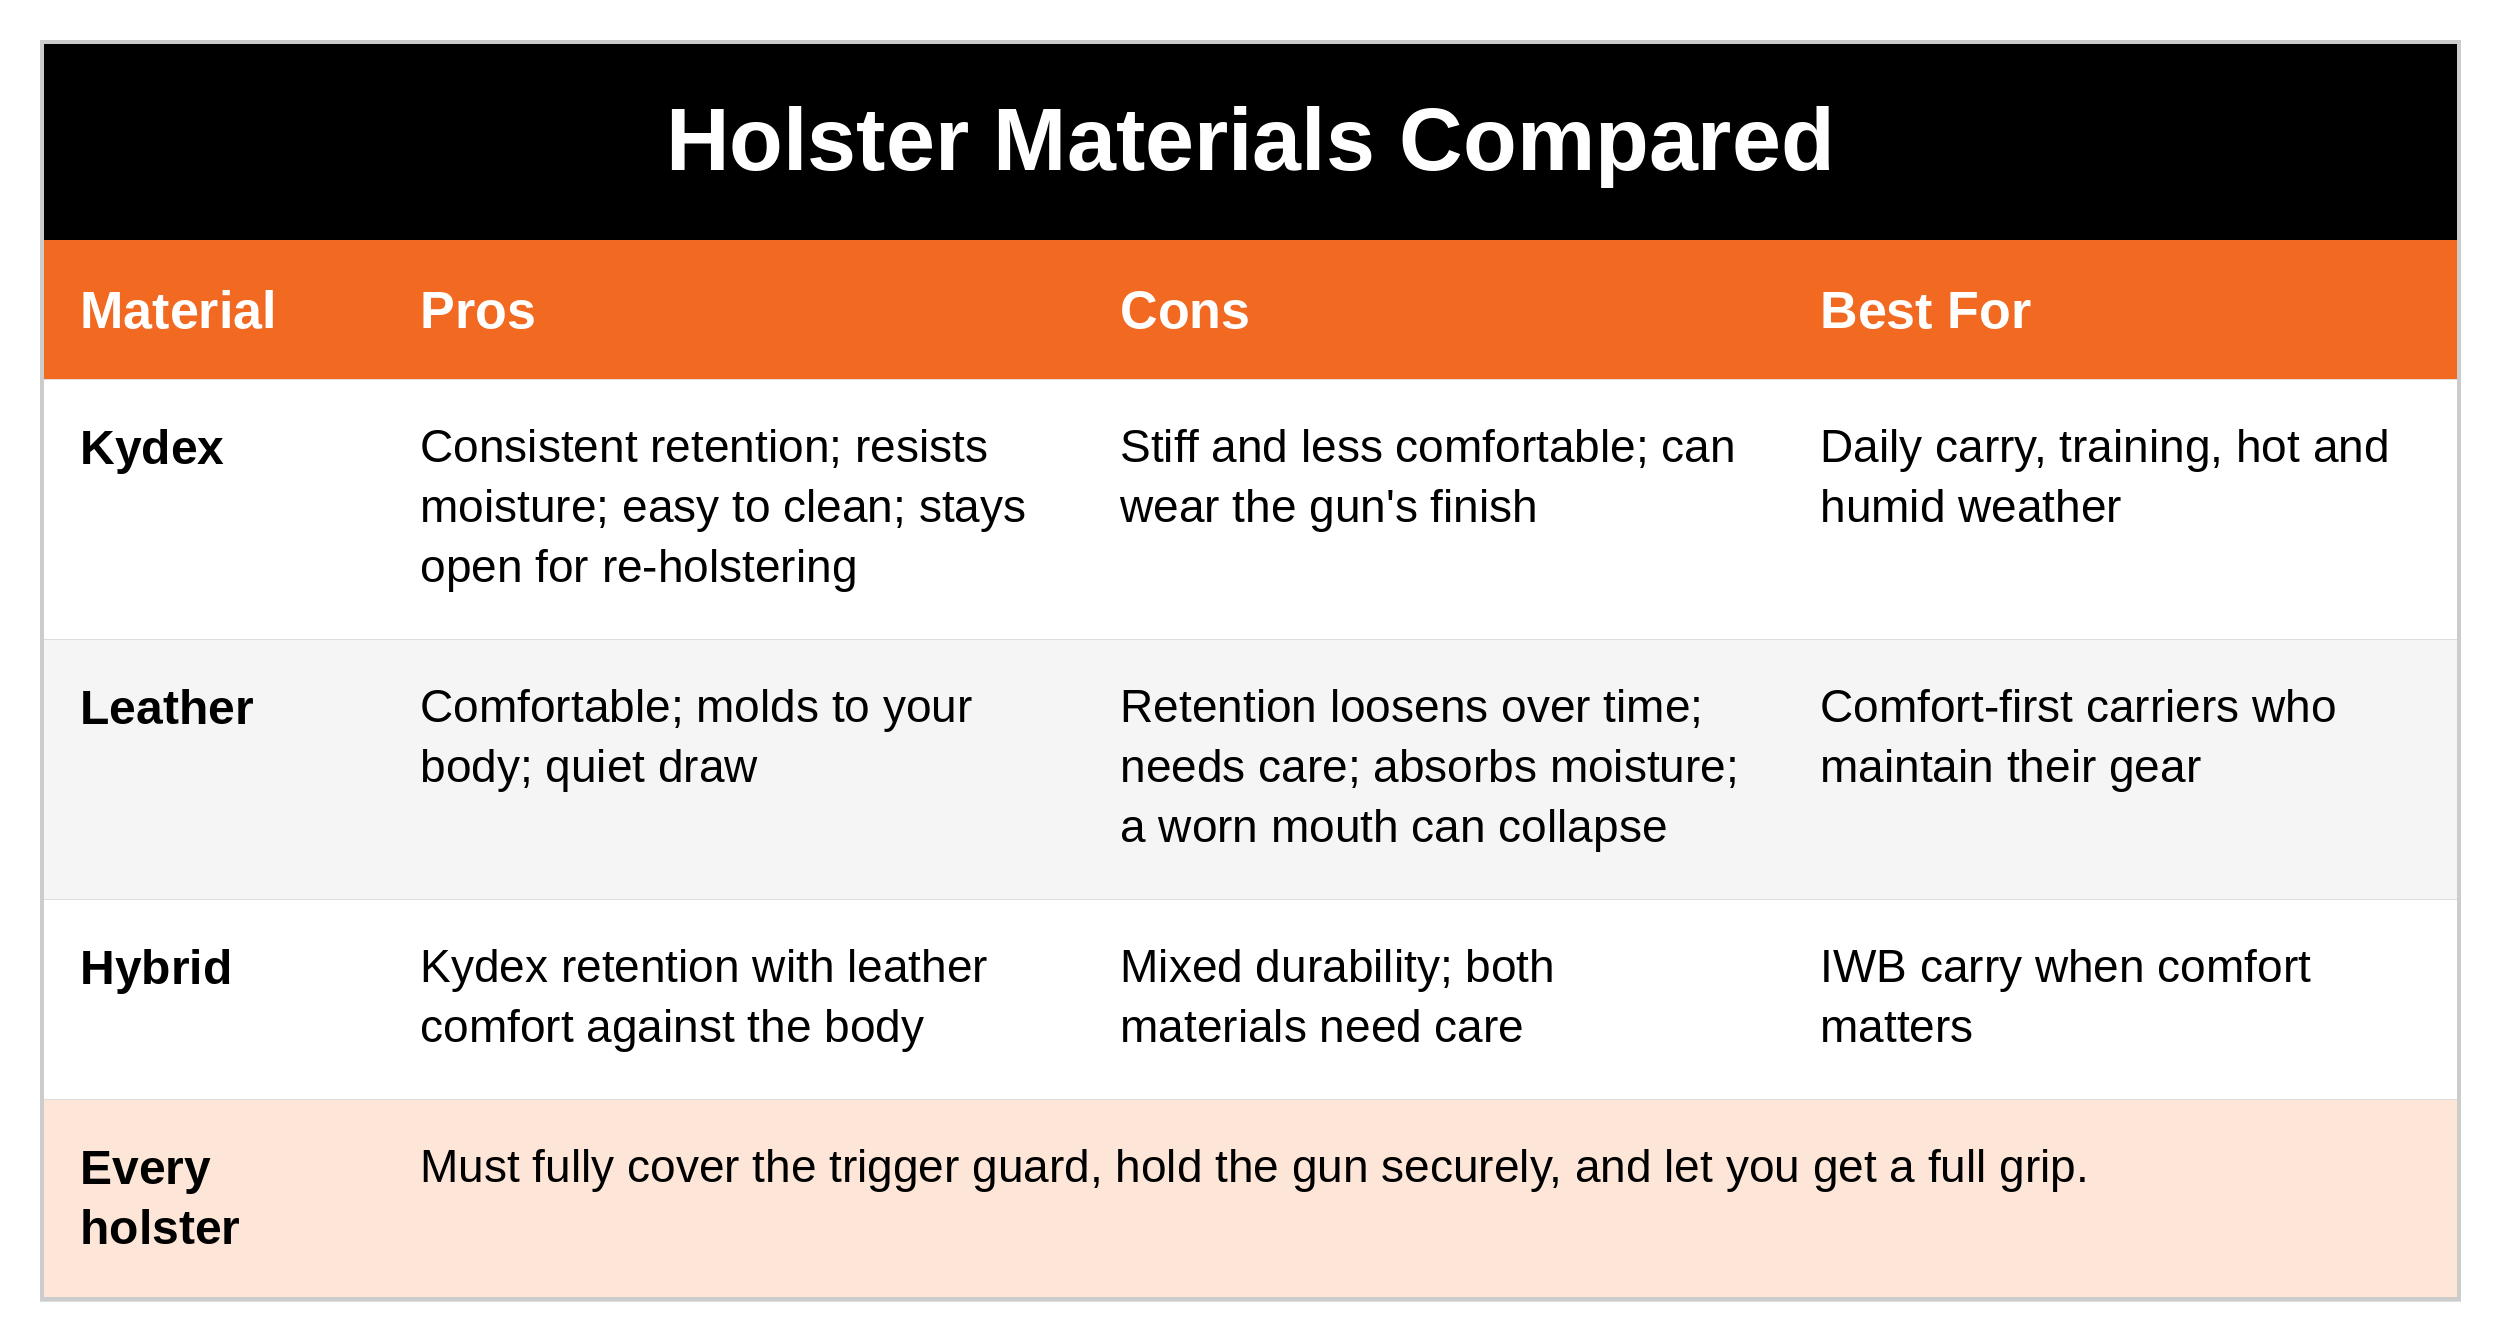
Kydex: A rigid plastic that holds its shape. Pros: consistent retention, resists moisture, easy to clean, and the mouth stays open for one-handed re-holstering. Cons: less comfortable because it's stiff, and it can wear your gun's finish over time.
Leather: Pros: comfortable, molds to your body over time, and quiet on the draw. Cons: retention can loosen over time, it needs care, and it absorbs moisture. Watch for a worn leather holster whose mouth collapses, which makes re-holstering unsafe.
Hybrid (Kydex and leather): Pros: Kydex retention with leather comfort against your body. Cons: mixed durability, and both materials need their own care.
Clearing Your Clothing
Your cover garment has to hide the gun and then get out of the way, fast.
How you clear it depends on where you carry:
Appendix or strong-side carry: lift or sweep the shirt hem up and out of the way with your support hand, or with your strong hand on a one-handed draw.
Under an open jacket or vest: sweep the garment back with your strong hand to expose the gun.
Shoulder holster: open the jacket to reach across your body.
Practice with the clothes you actually wear. A T-shirt clears very differently than a heavy winter coat.
Choosing Clothing for Concealed Carry
Your clothes should fit the gun and the holster, hide them without printing, and still let you reach them.
Fit: Looser or layered clothing hides a gun better, but it still has to clear quickly.
Material: Thicker fabric helps reduce printing. Flexible fabric is easier to clear.
Shirt length: Long enough to cover the holster when you reach up or bend over.
Seasons: Winter gives you jackets and layers. Summer may mean lighter clothes and a different carry method. Plan for both.
The Draw: Body Mechanics
Everyone's draw is a little different, so learn yours from a qualified instructor. The basics instructors teach include:
Clear the garment completely.
Get a full, firm grip on the gun while it's still in the holster, with your trigger finger straight along the frame.
Draw the gun straight up and out of the holster.
Rotate the muzzle toward the target while keeping it pointed away from your own body.
Bring your support hand in to meet the gun in front of your chest.
Push out toward the target and find your sights.
Your finger stays off the trigger until your sights are on the target and you've made the decision to shoot. [LINK: Part 4, The Four Universal Safety Rules]
Re-Holstering: Slow Down
Many negligent discharges happen while putting the gun away, not taking it out. There's never a reason to rush re-holstering.
Slow down. The threat is over, so take your time.
Look the gun into the holster if you need to.
Make sure nothing is in the way, like a shirt tail, a drawstring, or a jacket toggle that could get caught and press the trigger.
Finger straight, off the trigger, the whole way in.
With appendix carry, many instructors teach pushing your hips forward slightly so the muzzle points away from your body as the gun goes in.
Ambush, Reaction Time, and the 21-Foot Drill
Real violence is usually sudden and unexpected. That's an ambush, and it's why awareness matters more than speed.
The OODA Loop
Developed by Air Force Col. John Boyd, the OODA Loop describes how everyone reacts to a threat: Observe, Orient, Decide, Act. The earlier you observe something wrong, the more time you have for the rest. Someone who's caught looking at their phone starts the loop late.
The 21-Foot Drill: Myth vs. Reality
In 1983, Salt Lake City police Sgt. Dennis Tueller published an article called "How Close Is Too Close?" He found that an average person could cover about 21 feet in roughly 1.5 seconds, about the same time it takes a Police officer to draw and fire.
What it means: distance is time, and someone who seems "far enough away" can reach you faster than you think.
What it doesn't mean: it is not a legal rule that you can shoot anyone inside 21 feet. Whether force is justified depends on the whole situation. [LINK: Part 14, The Life-Altering Event: What Happens After]
Movement, Space, and Your Voice
Create space whenever you can. Step back, step off line, put an object between you and the threat.
Move. Standing still makes you an easy target. Training to draw while stepping off the line (often called "getting off the X") is a key skill.
Use your voice. "Stop! Back off!" A loud, clear command can end a situation before it starts, and it tells witnesses who's trying to avoid a fight.
Why Stress Changes Everything
There's a big difference between your heart rate going up from exercise and your heart rate going up from fear.
Exercise: your heart rate climbs, but your brain and body work together. You can still think clearly and use your hands well.
Stress or fear: an adrenaline surge triggers fight-or-flight. You may get tunnel vision, lose some of your hearing (auditory exclusion), and lose fine motor skills in your hands. Your thinking can narrow, and decisions can come too fast or too slow.
Even fit people perform worse under real stress. That's why your draw has to be practiced until it's automatic, and why adding a little pressure in training, like a shot timer or a supervised class, helps your skills hold up when it counts. [LINK: Part 6, Range Gear Guide]
Drills to Practice
When you practice working from concealment at home, always follow the dry fire protocol. [LINK: Part 7, Dry Fire Training]
At Home (Dry Fire)
Draw from concealment. Clear your clothing and draw from each position you carry. Smooth comes first; speed comes later.
Clothing interference. Practice in different garments, a T-shirt, a button-up, a jacket, so you're ready for whatever you're wearing.
Ambush awareness. Run through "what if" situations in your head: where would you move, what would you say, and would you even need to draw? Focus on noticing early and deciding fast.
Mirror work. Watch yourself draw in a mirror to check your posture and elbow and shoulder movement.
Step off the line. Add a step back or to the side as you draw.
At the Range (With an Instructor)
Once your dry fire draw is clean, these are the kinds of live fire skills to build, ideally with a qualified instructor:
Single shot from concealment at close range, focusing on a clean draw and sight picture.
Controlled pairs: two shots, focusing on grip and recovery between shots.
Drawing while moving off the line.
Drills on a shot timer to measure your draw and reaction time.
Some classes also run reaction drills that simulate a fast-approaching threat. Those should only be done in a supervised class with proper safety controls. And before any live fire, make sure your group has a medical plan. [LINK: Part 5, Range Day Basics: Terms and Commands]
Keep SCAN at the Center
Drawing is the last step, never the first. SCAN keeps you from needing it: S - See your environment (start your OODA Loop early), C - Create space (distance is time), A - Act deliberately (move, use your voice, leave), and N - Never doubt your gut feelings (if someone's closing distance and it feels wrong, act).
What to Say
To someone closing in on you: "Stop! Back off!" Loud, clear, and with your hands up in front of you.
To your instructor: "Can you watch my draw and re-holster and tell me what to fix?"
To yourself when re-holstering: "Slow. Clear. Finger straight."
Ask Yourself
Does my holster cover the trigger, hold the gun securely, and let me get a full grip?
Have I practiced my draw in the clothes I actually wear, in every season?
If someone 21 feet away rushed me right now, would I have seen them coming?
Remember
Concealed carry isn't just about having a firearm. It's about being prepared, responsible, and confident. Choose gear that fits your life, practice slowly and often, re-holster with care, and carry with purpose.
Get Started Today
[FREE DOWNLOAD: TBD. Suggested: Working From Concealment Home Practice Checklist] [CTA: Comment or DM "KEYWORD" / or download it here: LINK]
Go Deeper
The Family Safety Toolkit. Carrying responsibly is one part of keeping your family safe. The Toolkit gives you 20 checklists covering every area of family safety and preparedness, from your home and vehicle to travel and your go bag, all for $19.99. [Get it here: https://www.preparednotparanoid.com/family-safety-toolkit]
The Family Emergency Preparedness Manual is coming soon.
Tools I recommend: The holsters, belts, and training gear I recommend are in my Range Essentials Amazon store. https://link.amazon/B0hxQD89P Related reading:
Firearms and Family Safety, Part 7: Dry Fire Training [LINK]
Firearms and Family Safety, Part 8: Concealed Carry Positions [LINK]
Firearms and Family Safety, Part 10: Concealed Carry Permits and Where You Can't Carry [LINK]
Firearms and Family Safety, Part 14: The Life-Altering Event: What Happens After [LINK]
References
Tueller, Dennis. "How Close Is Too Close?" SWAT Magazine, March 1983.
Boyd, John R. The OODA Loop (Observe, Orient, Decide, Act), from his work on decision-making and conflict.
U.S. Concealed Carry Association (USCCA). Concealed carry, holster selection, and drawing from concealment resources.
Betz, Lawrence. Navigating the Red Zone and Beyond (the SCAN framework).
Disclaimer
These suggestions are intended to help you and your family build awareness, confidence, and safer decision-making habits. No safety plan, checklist, or tool can guarantee 100% protection. This article is for general informational purposes only and is not legal advice or a substitute for hands-on firearms training with a qualified instructor. Live fire drills, especially drawing from concealment and drills involving movement, should be learned under qualified supervision. Concealed carry and use-of-force laws vary by state and situation, so check your local laws and talk to a qualified attorney about your specific situation. Always store firearms securely and out of reach of children. Affiliate disclosure: I've linked to products from my Amazon store that I personally recommend. As an Amazon Associate, I earn from qualifying purchases, at no extra cost to you. Thank you for supporting my work.
If you are in immediate danger, get to safety and call 911.
Awareness gives you time. Time gives you options.
The Prepared Protector is someone who's decided that loving someone means being ready for them, not just hoping things go fine.
Prepared Not Paranoid. Protecting the Most Vulnerable Among Us.