Bodyweight Exercises, Lower Body and Core
By Larry Betz | Prepared Not Paranoid https://www.preparednotparanoid.com/
Updated November 8, 2026
A gym can close. The power can go out. You can be stuck in a hotel room for a week on the road. None of that has to stop your training.
In Part 2, we covered the variables that make a workout work: sets, reps, tempo, rest, and how to know when it's time to make it harder. Now let's put them to work with the one piece of equipment you never have to pack, buy, or plug in: your own body.
If you know a handful of solid bodyweight exercises, and how to make each one easier or harder, you can train anywhere, anytime. This post covers six exercises for your legs, hips, and core. Part 4 covers the upper body and conditioning, how to pair exercises, and a sample workout that puts all eleven together.
Bodyweight exercises work at every fitness level. If you're just starting, they're a safe way to build strength, flexibility, and endurance and to learn the foundational movements, with no equipment or gym membership. If you're already fit, there's always a harder version to work toward.
The Lower Body and Core Movement Patterns
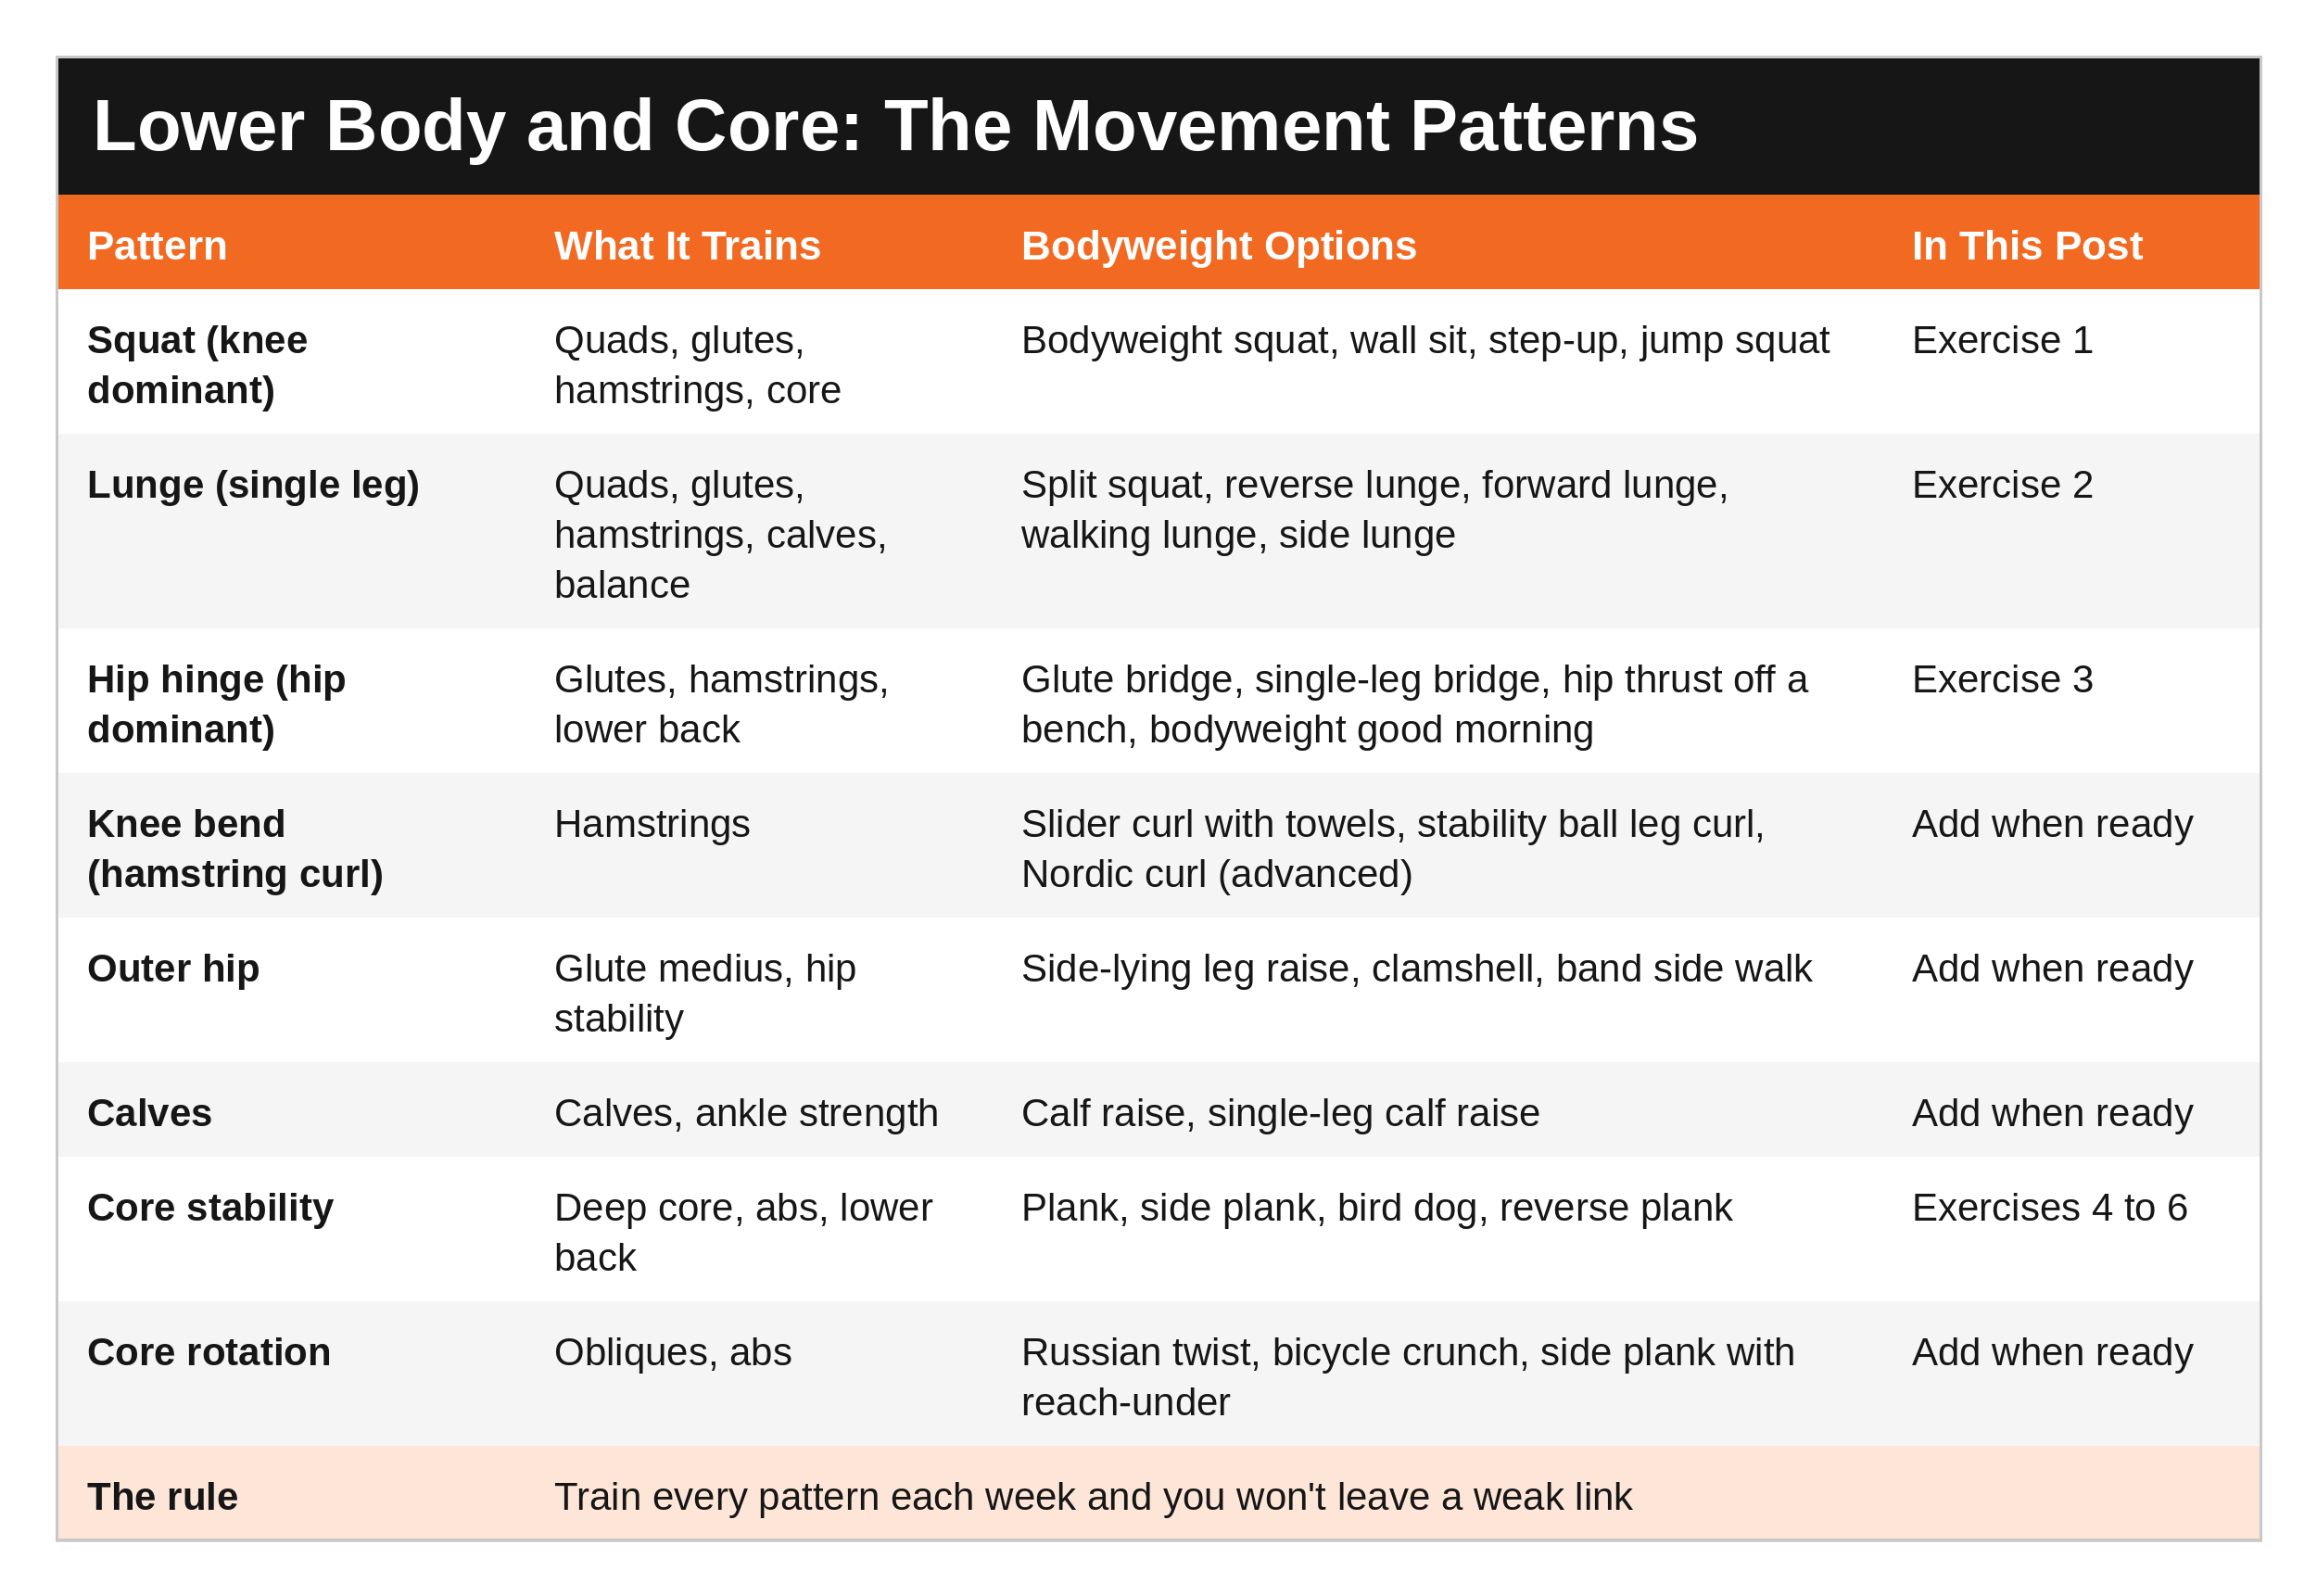
Every lower body and core exercise fits into a handful of movement patterns. Train each pattern every week and you'll have a balanced program with no weak links. Here's what each pattern trains, and the bodyweight options for each. The six exercises in this post cover the big ones, and you can add the others as you progress.
How to Use This Guide
Every exercise below has a standard version, easier versions (regressions), and harder versions (progressions), all in the grid below. Start with the version you can do with good form, and move up only when it feels controlled and solid.
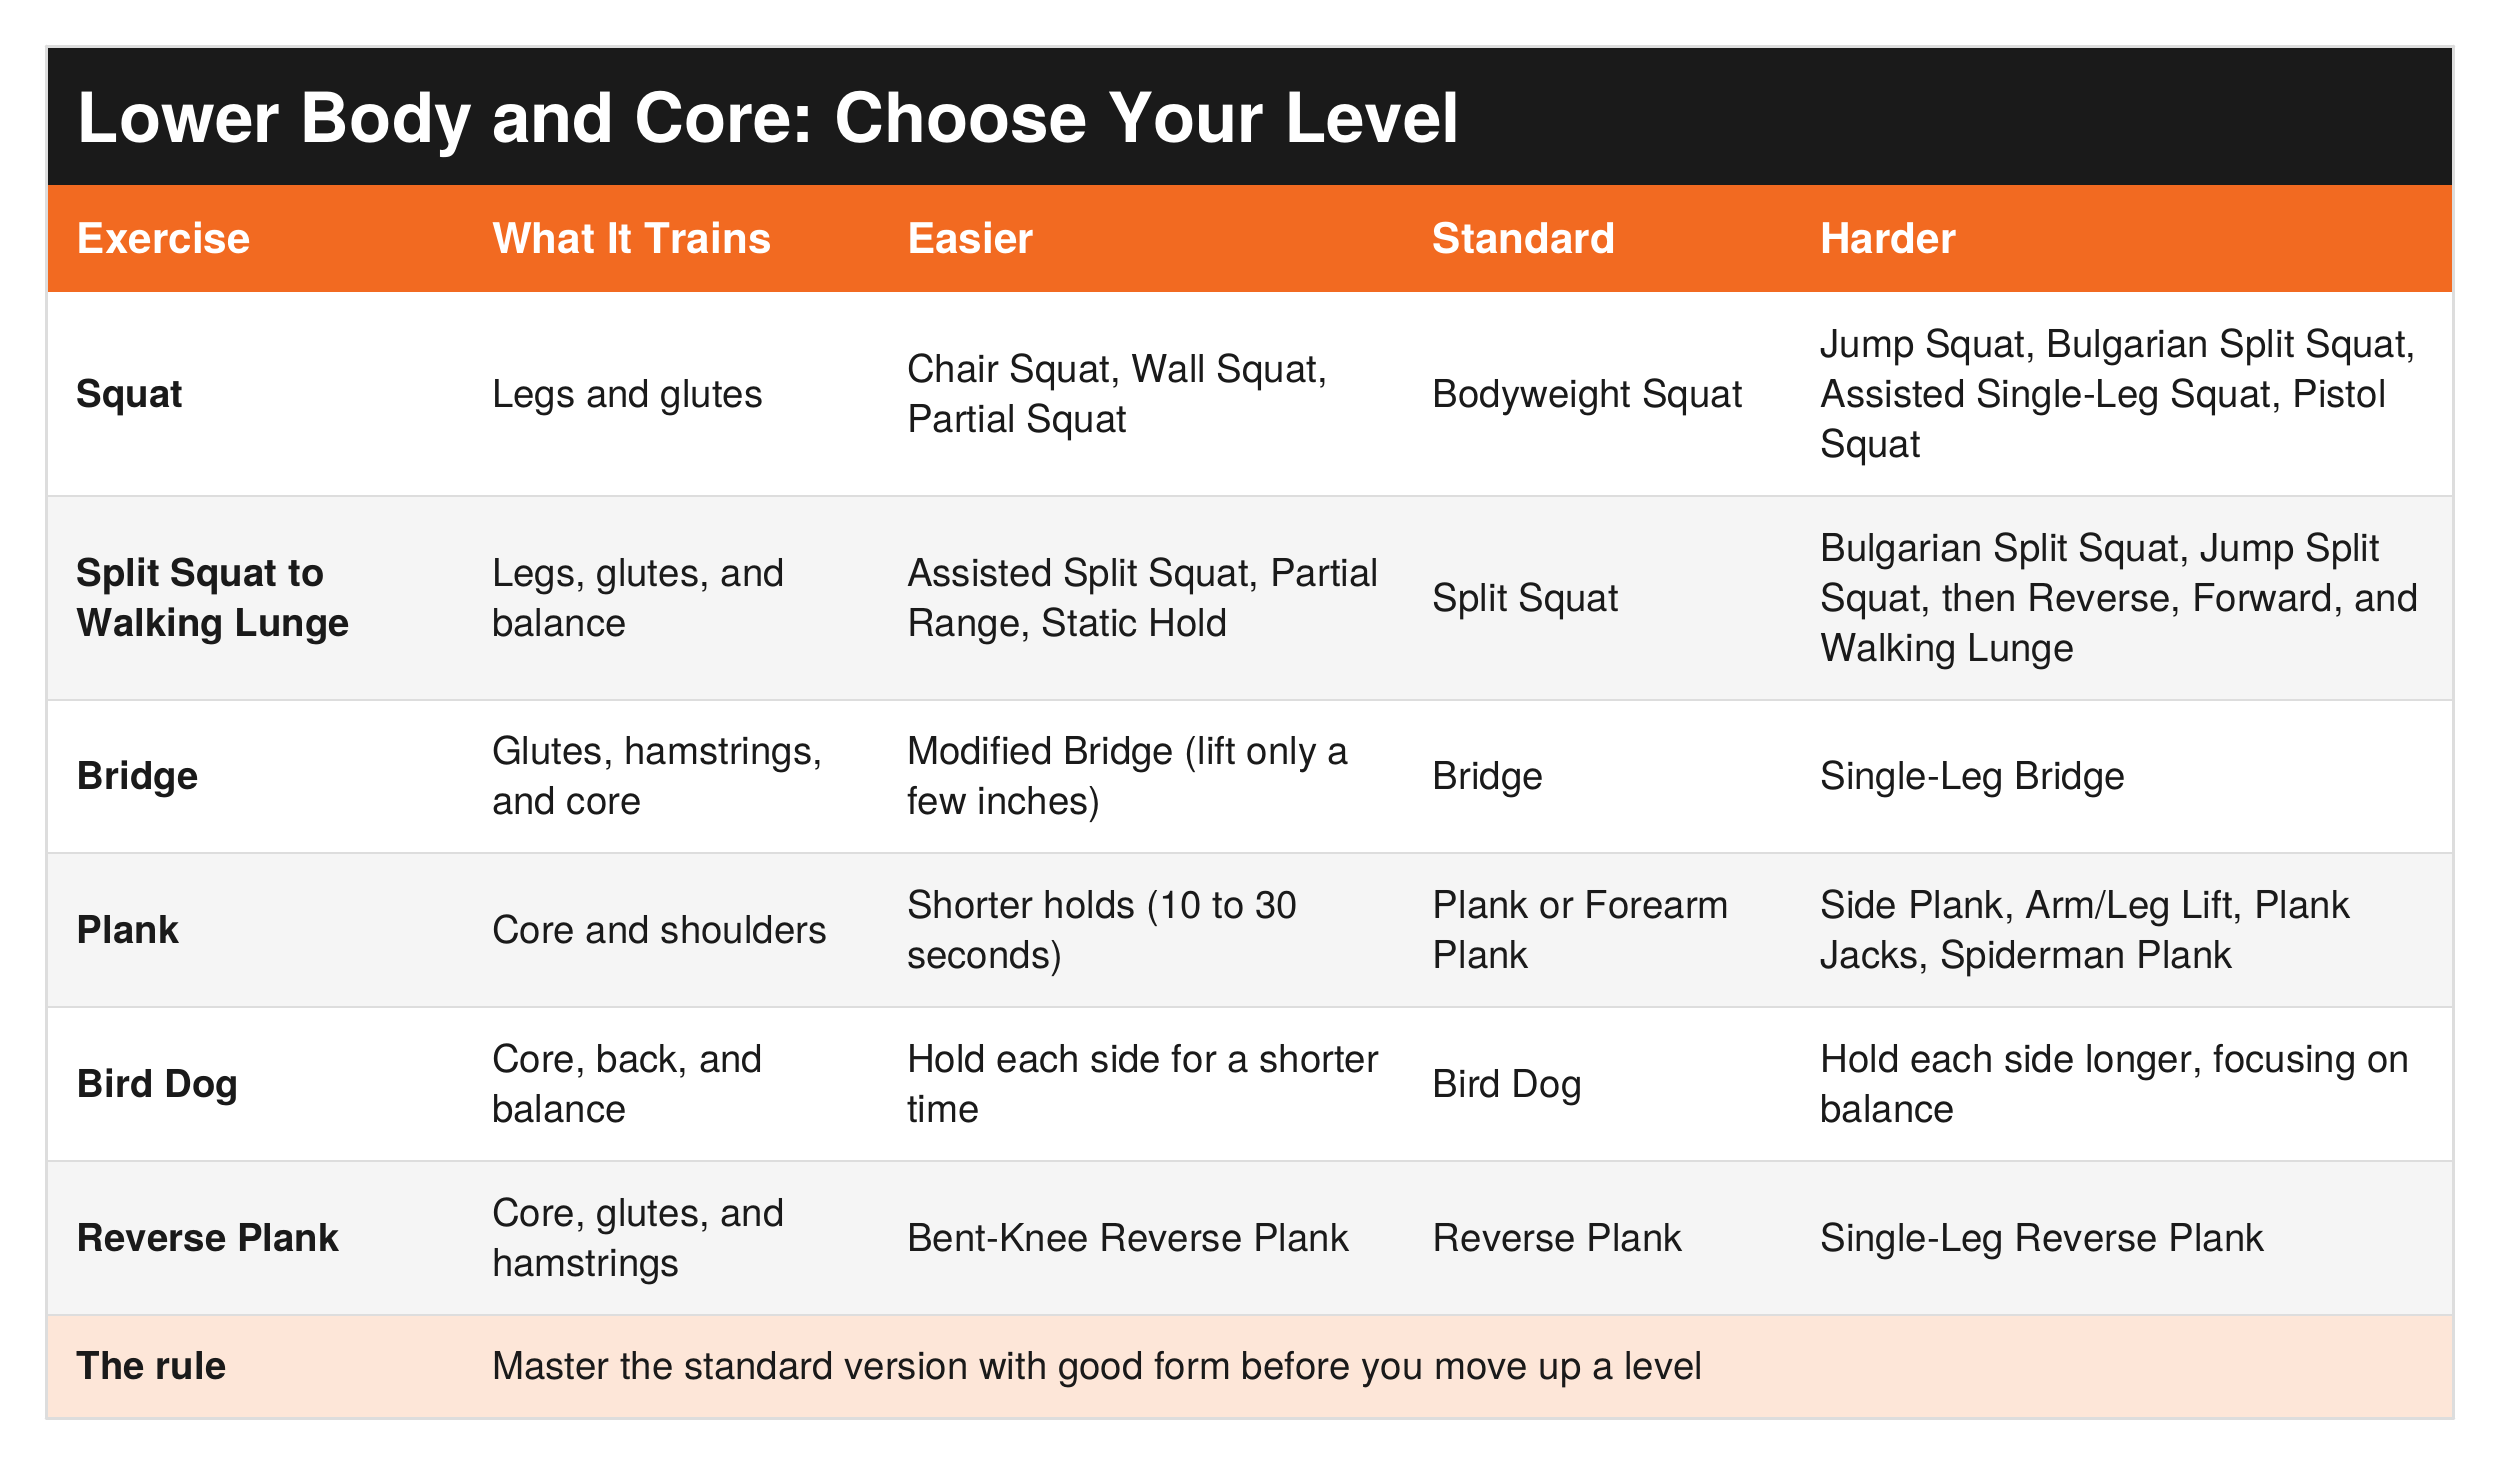
Everything you learned in Part 2 still applies here. Pick a rep range that matches your goal, control your tempo, rest with a purpose, and write it down in your Training Log. When you hit the top of your rep range on every set with good form, that's your signal to move to the next progression. That's double progressive overload with your bodyweight.
Before you start: Warm up first. My Dynamic Warm-Up Guide takes you head to toe in about 10 minutes and gets your body ready for this work.
Each exercise below has a short demonstration video and the three cues I'd give you if I were standing next to you. Watch the video once, then keep the cues in mind while you train.
Exercise 1: Bodyweight Squat
Watch it: https://www.youtube.com/watch?v=ZLJBfYF_oO0
Sit back. Feet shoulder-width apart, toes turned out slightly. Push your hips back like you're sitting in a chair, with your chest up and your back straight.
Knees follow your toes. Don't let them cave in. Lower until your thighs are parallel to the floor, or as low as you can comfortably go, with your weight on your heels.
Drive through your heels. Exhale as you stand all the way back up.
Exercise 2: Split Squat Progressions to Walking Lunge
Watch it: https://www.youtube.com/watch?v=4aqrcebiFZo
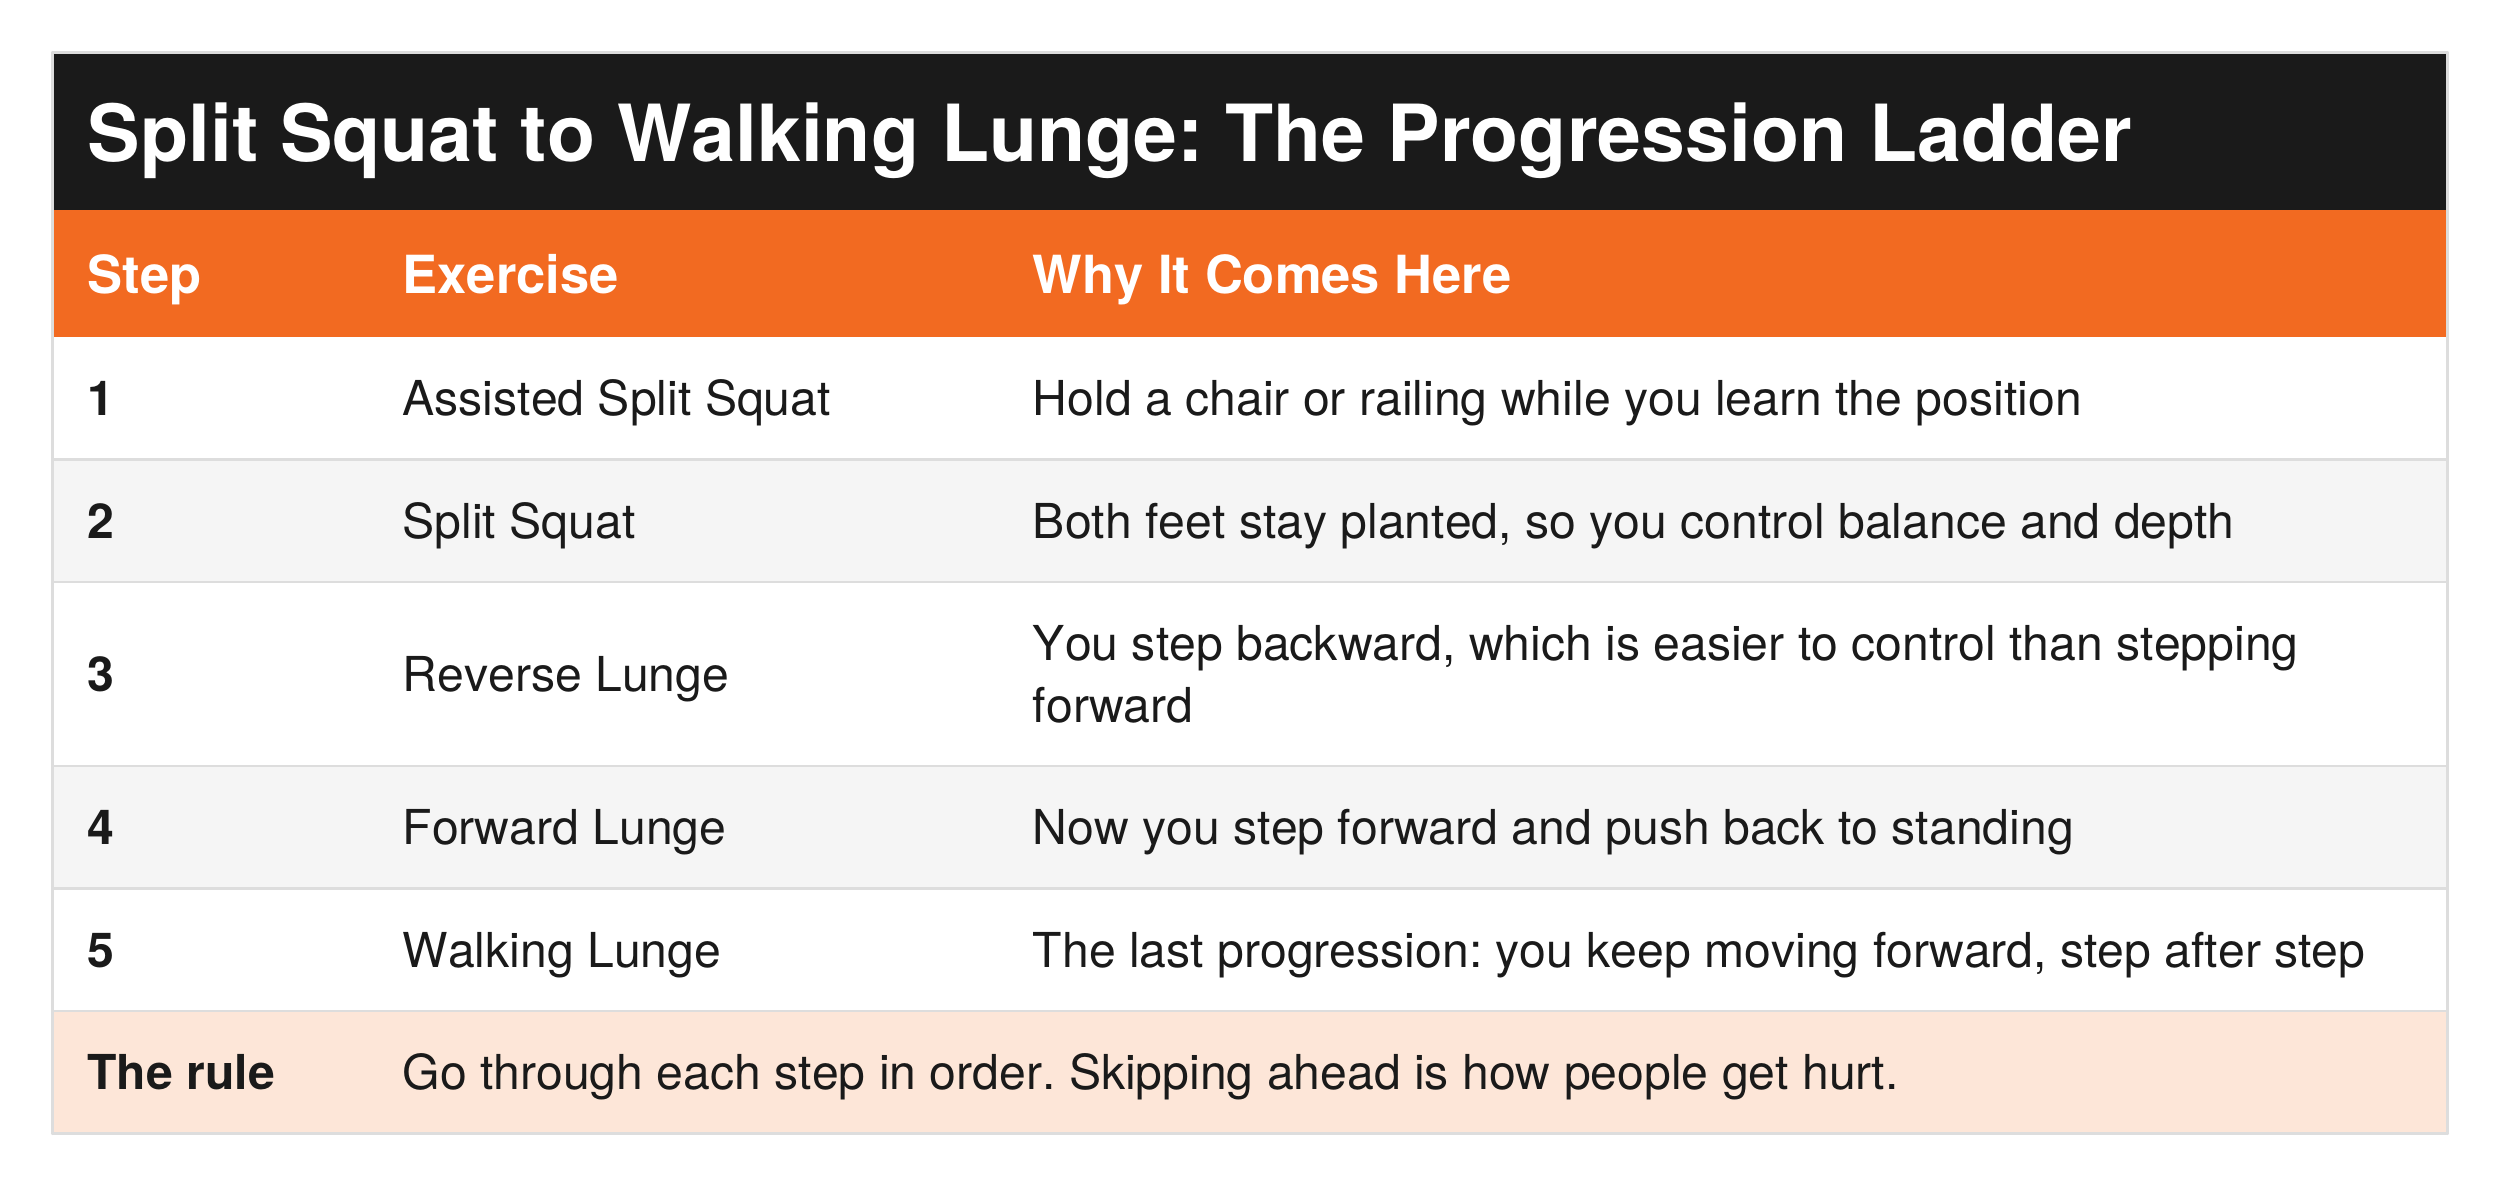
The split squat is the foundation, and the walking lunge is the last step. Work your way up in this order:
Set your stance. Feet hip-width apart, with one foot 2 to 3 feet behind you and your back heel off the floor.
Drop straight down. Lower until your back knee nearly touches the floor and your front knee is over your ankle. Keep your torso upright.
Push through your front heel to stand back up. Finish your reps, then switch legs.
Walking lunge: https://www.youtube.com/watch?v=YYWhkctnP2o
The walking lunge is the last progression with this exercise. From my experience, please make sure you have gone through the previous exercises to prevent injuries.
Exercise 3: Bridge
Watch it: https://www.youtube.com/watch?v=EEtd0uY-bMw
Set your feet. Lie on your back, knees bent, feet flat and hip-width apart, close enough that your fingertips can just touch your heels.
Squeeze and lift. Squeeze your glutes and press through your heels until your body forms a straight line from your shoulders to your knees.
Hold, then lower slowly. Pause a few seconds at the top, then lower without arching your back.
Exercise 4: Plank
Watch it: https://www.youtube.com/watch?v=6LqqeBtFn9M
Stack it. Hands (or elbows for a forearm plank) directly under your shoulders, legs straight behind you, toes on the floor.
One straight line. Head to heels. Don't let your hips sag or pike up, and look at a spot on the floor just ahead of you.
Brace and breathe. Pull your belly button toward your spine and breathe steadily. Start with 10 to 30 second holds and build from there.
Exercise 5: Bird Dog
Watch it: https://www.youtube.com/watch?v=KA0ekfSePrQ
Start on all fours. Hands under your shoulders, knees under your hips, back flat, eyes on the floor.
Reach long. Extend your right arm forward and your left leg back until they form a straight line with your body. Keep your hips square to the floor.
Hold, then switch. Hold a few seconds, return slowly without arching your back, then do the other side.
Exercise 6: Reverse Plank
Watch it: https://www.youtube.com/watch?v=PgezBeNqke0
Set up. Sit with your legs straight out in front of you and your hands on the floor just behind your hips, fingers pointing toward your feet.
Lift. Press through your hands and heels and lift your hips until your body forms a straight line from head to heels.
Hold and control. Hold 15 to 30 seconds, squeezing your glutes and hamstrings, then lower with control.
What's Next
You now have six exercises that cover your legs, hips, and core, and every one of them can be done in a living room, a hotel room, or a backyard. In Part 4, we'll finish the set with the upper body and conditioning: push-ups, chair dips, jumping jacks, mountain climbers, and the inverted row. You'll also learn how to pair exercises, and I'll give you a sample workout that puts all eleven together.
See It in Action
Want to see each of these exercises demonstrated? Check out the videos below. Each one walks you through proper form, so you can watch it once before you try it yourself.
| See It in Action: Lower Body and Core Demonstrations | |||
|---|---|---|---|
| # | Exercise | Video | Link |
| 1 | Bodyweight Squat | Bodyweight Squat: How To (3 steps to proper form) | Watch ▶ |
| 2 | Split Squat | Split Squat: How To (3 steps to proper form) | Watch ▶ |
| 2 | Walking Lunge | How to Do Walking Lunges | Watch ▶ |
| 3 | Bridge | How to Do the Perfect Glute Bridge | Watch ▶ |
| 4 | Plank | How to Do the Perfect Plank | Watch ▶ |
| 5 | Bird Dog | How to Do a Bird Dog Exercise | Watch ▶ |
| 6 | Reverse Plank | How to Do a Reverse Plank: A Guide from Physical Therapists | Watch ▶ |
| Tip | Watch the full video once before you try the exercise, then start with the easier version if you need it. | ||
The Prepared Protector trains for the day the gym isn't an option. Six exercises, a floor, and 30 minutes are enough to keep your legs, hips, and core strong anywhere. Pick your level, write it down, and move up only when you've earned it.
Ask Yourself
Which version of each exercise can I do right now with good form?
Am I rushing to the harder version before I've earned it?
If I couldn't get to a gym for a month, would I still have a plan?
Remember
Your body is the one piece of equipment you always have with you. Start at the level you can do well, write it down, and move up one step at a time. That's how you build strength that lasts.
Get Started Today
Start every session with my free Dynamic Warm-Up Guide, the 16-move, head-to-toe warm-up I recommend before every workout, including this one. [Get it here: LINK]
Track every exercise, set, and progression with my free Prepared Not Paranoid Training Log, so you can see exactly when it's time to move up a level. [Get it here: LINK]
Go Deeper
The Family Safety Toolkit includes 20 ready-to-use checklists across home, family, travel, and preparedness, so your whole family has a plan. [Get the Toolkit here: LINK]
Coming soon: my complete fitness guide. Full programs for building strength, endurance, and mobility at home, including the full exercise menu for every movement pattern, with dumbbell, barbell, and machine options.
Tools I recommend: You'll find the exercise mats, resistance bands, and home training gear I recommend in my Amazon store. https://link.amazon/B00AACEyH
Related reading:
Strength Training Foundations, Part 2: Strength Training Basics https://www.preparednotparanoid.com/pnp-library/strength-training
Strength Training Foundations, Part 4: Bodyweight Exercises, Upper Body and Conditioning https://www.preparednotparanoid.com/pnp-library/strength-training-foundations-part-4
Walking and Balance for Seniors https://www.preparednotparanoid.com/pnp-library/walking-and-balance-for-seniors
Mobility, Stability, Stretching, and Self Care, Part 1: The Foundation of Movement https://www.preparednotparanoid.com/pnp-library/stretching-mobility
References
Haff, G. G., & Triplett, N. T. (Eds.). (2016). Essentials of Strength Training and Conditioning (4th ed.). National Strength and Conditioning Association. Human Kinetics.
U.S. Department of Health and Human Services. (2018). Physical Activity Guidelines for Americans, 2nd edition. https://health.gov/our-work/nutrition-physical-activity/physical-activity-guidelines/current-guidelines
Disclaimer
These suggestions are intended to help you and your family build awareness, confidence, and safer decision-making habits. No safety plan, checklist, or training can guarantee 100% protection. The goal is not to create fear, but to help guide families toward more informed, prepared, and practical safety decisions in everyday life. As an Amazon Associate, I earn from qualifying purchases. Product mentions reflect my own experience.
This article is for general informational and educational purposes only. It is not medical advice and is not a substitute for guidance from your physician or a qualified fitness professional. Exercise carries a risk of injury. Talk to your doctor before starting any new exercise program, especially if you have a medical condition, past injuries, or have been inactive. Stop any activity that causes pain, dizziness, or chest discomfort.
If you have chest pain, severe shortness of breath, or feel faint during exercise, stop and call 911.
Awareness gives you time. Time gives you options.
The Prepared Protector is someone who's decided that loving someone means being ready for them, not just hoping things go fine.
Prepared Not Paranoid. Protecting the Most Vulnerable Among Us.