A Bag You Can't Carry and a Plan You've Never Tried Won't Help You
By Larry Betz | Prepared Not Paranoid https://www.preparednotparanoid.com/
Most bug-out bags are packed by people who have never walked a mile with them. It all looks great on the closet floor. Then the day comes, the car can't get through, and you find out the bag weighs 45 pounds, your shoulders are on fire after half a mile, and your kids can't keep up. So how heavy should a bug-out bag be? And how do you know your plan will actually work? This last post in the series answers both.
Why Weight Matters
I ran gyms for over 20 years, and my specialty was post-rehabilitation and the aging population. I've seen what happens when people load up more than their body is ready for. A bag that's too heavy slows you down, wears you out, and gets people hurt. Backs, knees, shoulders, and feet are usually the first to go. In an evacuation, an injury doesn't just affect you. It slows down your whole family.
That's why your Bug-Out Bag has to match your fitness level and load capacity. Your ability to carry your bag over a long distance matters. Pack only what you can realistically manage.
How Much Can You Carry?
There's no perfect number for everyone, but there are good starting points. Outdoor and pediatric experts use body weight as the guide. Here are the guidelines I'd start with.
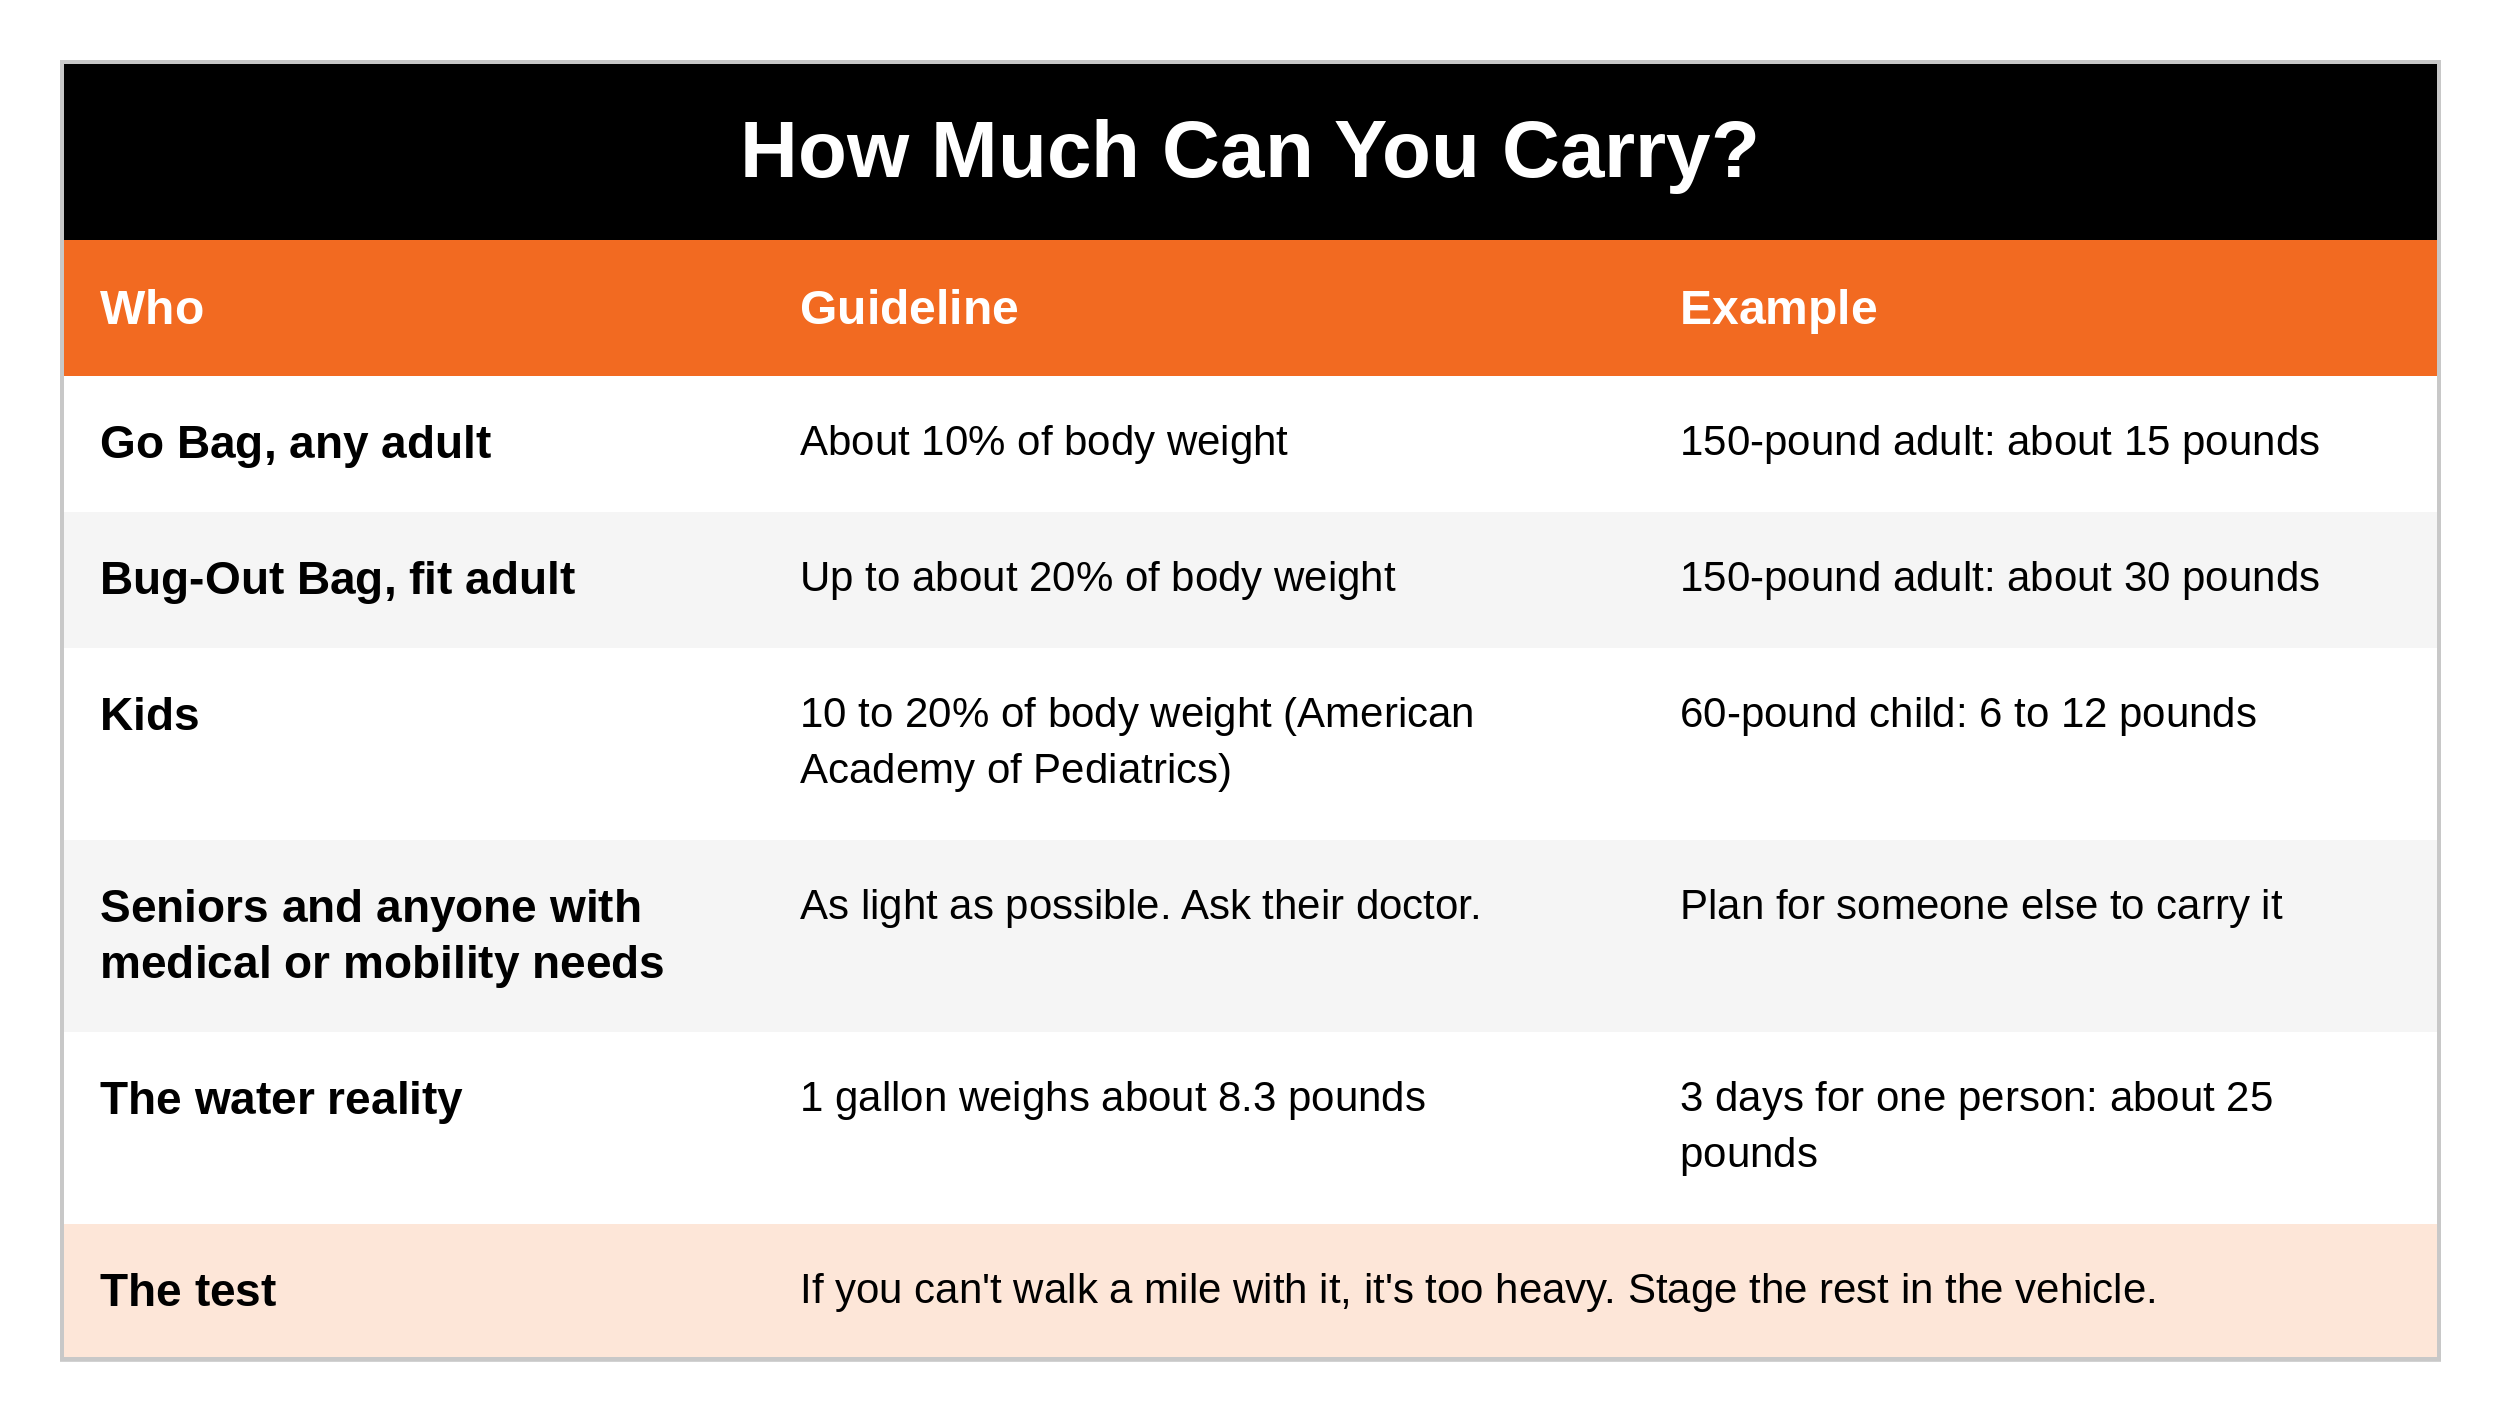
Go Bag: about 10% of your body weight. That's in line with what REI recommends for a day pack.
Bug-Out Bag: up to about 20% of your body weight for a fit adult. REI uses the same guideline for a multiday pack. For a 150-pound adult, that's about 30 pounds.
Kids: the American Academy of Pediatrics says a child's backpack should weigh no more than 10 to 20% of their body weight.
Seniors and anyone with medical or mobility needs: as light as possible. Ask their doctor, and plan for someone else to carry their bag if needed.
Now look at the water. Three days of water for one person weighs about 25 pounds. For most people, that's almost the entire Bug-Out Bag. This is why the plan matters more than the pack.
How to Cut Weight
Carry a filter, not all your water. A good filter and purification tablets let you make clean water on the way. Carry a day's worth and stage the rest in the vehicle.
Stage what you can't carry. Your vehicle is your Mobile Command Center. Tools, extra water, extra food, and the larger power gear ride in the car.
Share family gear. One stove, one first aid kit, and one set of tools for the whole family, not one per person.
Pack lighter food. Freeze-dried meals and calorie-dense bars weigh far less than cans.
Pick gear that does more than one job. A multi-tool instead of a toolbox. A headlamp instead of a lantern.
Ask one question about every item: "Will I actually use this in the first 72 hours?" If not, it goes in the vehicle or stays home.
Pack It Right and Wear It Right
How you pack a bag matters almost as much as what's in it.
Heaviest items high and tight, close to your back and between your shoulder blades, so the bag doesn't swing
Lighter items at the bottom and the outside pockets
Things you'll need fast (first aid, flashlight, rain gear, water) on top or in an outside pocket
Use both shoulder straps, and the hip belt if your bag has one. The hip belt puts the weight on your hips instead of your shoulders.
Tighten the straps so the bag sits close to your body and doesn't swing
For kids, the American Academy of Pediatrics says the same thing: both straps, every time.
Train for It
Here's where my coaching background comes in. In an emergency, you won't rise to the occasion. You'll fall to the level of your training. You wouldn't run a race you never trained for. Don't trust a bag you've never carried.
Start with the test. Load your bag and put it on. Walk around the block, then try a mile. Pay attention to what rubs, what pulls, and what hurts. Wear the shoes you'd actually evacuate in. This is where people learn why I say no flip-flops.
If that mile was a struggle, don't fix it by forcing it. Train for it. That's exactly what my free 90-Day Aerobic Fitness Program is built for. It walks you from wherever you're starting to up to an hour of walking and rucking, one safe week at a time:
New or coming back from a break? Start with walking. The 12-week walking plan builds you up 3 to 5 minutes a week.
Ready to ruck? You should be able to walk 30 minutes briskly without pain first. Then start light, with 5 to 10 pounds, not your full Bug-Out Bag.
Time before weight. Build your time and distance first. Add weight only when the current load feels easy, and never add weight and time in the same week.
Grow slowly. Increase time, distance, or weight by about 5 to 10% a week, and take an easier recovery week every fourth week.
Use the talk test. Most of your training should feel moderate. If you can talk but not sing, you're in the right zone.
Work up to your real bag. By the end of the rucking plan, your working weight should be close to what your Bug-Out Bag actually weighs. Then walk that mile again.
Train the family too. Walk with the kids and their bags. Walk with your parents at their pace. Now you know what your real family pace is.
For the full "why" and "how," including choosing a ruck or weighted vest, read Aerobic Fitness, Part 1: Walking and Rucking. And warm up before every session with my free Dynamic Warm-Up Guide.
If you have an injury, a medical condition, or haven't been active in a while, talk to your doctor before you start training with weight.
Choose Your Destinations
A bag gets you out the door. A destination tells you where to go. Ready.gov recommends picking meeting places at three distances. I add a fourth: the place you'll actually stay.
Near your home. A spot just outside, like the end of the driveway or a neighbor's mailbox, for sudden emergencies like a house fire.
In your neighborhood. A spot nearby, like a park, a church, or a friend's house, in case you can't get home.
Outside your town. A place everyone knows, in case your whole area is affected.
Your destination. Where you'll stay: a friend or family member's home outside the risk area, a hotel, or a shelter. Pick a first choice and a backup, and make sure they accept pets if you have them.
For each one:
Map two routes, and keep paper maps in the vehicle in case cell service goes down
Call ahead to the people you plan to stay with so they know they're part of the plan
Choose an out-of-area contact that everyone in the family checks in with
Write it all down and give every family member a copy for their bag or wallet
Practice the Plan: Your Family Drill
A plan you've never practiced is just a piece of paper. A locked gate, a missing key, an uncooperative pet, or an unfamiliar route is a lot easier to fix before an emergency than during one.
Run a family drill at least twice a year. An easy time to do it is when the clocks change, the same day you check your bags.
Announce it. "This is a drill. We're leaving in 10 minutes."
Start a timer.
Everyone grabs their bag and their items from the 10-Minute List (see Part 2).
Load the pets. This is usually the part that takes the longest.
Load the car and get everyone buckled in.
Drive to your neighborhood meeting place. For a bigger drill, drive your evacuation route to your out-of-town meeting place.
Stop the timer and talk about it.
Try different versions: a drill at night, a drill where one parent isn't home, a drill where you take the backup route, and a drill on foot to your neighborhood meeting place.
After the Drill: Make a Fix-It List
Ask everyone, including the kids:
What slowed us down?
What did we forget?
What was too heavy?
Did anyone not know what to do?
Then fix it. Move the bags closer to the door. Hang the leash next to the carrier. Make a spare key. Lighten the bag that was too heavy. Every problem you find in a drill is one you won't have in a real emergency.
You've Finished the Series
If you've worked through this series, you now know the difference between a Go Bag and a Bug-Out Bag. You know what goes in each, when to leave, and what to grab in 10 minutes. You've planned for your documents, cash, and medications, for the kids, seniors, and pets in your home, and for what your family can really carry. That's not paranoia. That's a family that's ready.
Next up is the Mobile Command Center series, because for most families the vehicle is the real bug-out plan.
Ask Yourself
Have I actually put on my Bug-Out Bag and walked a mile with it?
Does every person in my family know our meeting places and our out-of-area contact?
When was the last time we ran a drill, and how long did it take us to get out the door?
Remember
Pack what you can carry, and practice what you plan. Keep the bag light, stage the rest in the vehicle, know where you're going, and run the drill until it feels routine.
Get Started Today
Grab the free Preparedness checklist bundle: the Go Bag Checklist, the Mobile Command Center Checklist, and the First Aid and Trauma Checklist. Print them, check them off, and keep them with your gear. [CTA: Comment or DM "KEYWORD" / or download it here: https://www.preparednotparanoid.com/preparedness]
Go Deeper
The Family Safety Toolkit. This post shows you how to keep your bags light and practice the plan. The Toolkit gives you the printable checklists to run your drills and bag checks from: the complete Go Bag Checklist, the Mobile Command Center Checklist to get your vehicle ready, the First Aid and Trauma Checklist, and 17 more checklists covering every area of family safety, all for $19.99. [Get it here: https://www.preparednotparanoid.com/family-safety-toolkit]
The Family Emergency Preparedness Manual is coming soon.
Free download: The 90-Day Aerobic Fitness Program. Train to carry your bag. Section 3 has the full 12-week rucking plan, a Start Here check-in, and a printable tracker, plus walking, walk-jog, agility, and strongman plans. [Get it here: LINK TO 90-DAY PROGRAM]
Free download: Dynamic Warm-Up Guide. The 16-move warm-up I recommend before every session. [Get it here: LINK TO WARM-UP GUIDE]
Tools I recommend: The everyday carry gear, first aid kits, flashlights, and backup communications I recommend are in my Amazon store.
Everyday Carry: https://link.amazon/B08cbUYC1
First Aid: https://link.amazon/B01SD3sHS
Flashlights: https://link.amazon/B0giJW8RY
Backup Communications: https://link.amazon/B09z0lfEb
Related reading:
Go Bag and Emergency Bug-Out Bag, Introduction: Go Bag vs Bug-Out Bag https://www.preparednotparanoid.com/pnp-library/go-bag-intro
Go Bag and Emergency Bug-Out Bag, Part 5: Bags for Kids, Seniors and Pets https://www.preparednotparanoid.com/pnp-library/go-bag-kids-seniors-pets
Aerobic Fitness, Part 1: Walking and Rucking https://www.preparednotparanoid.com/pnp-library/fitness-lesson-4a-walking
Setting Up Your Mobile Command Center: Introduction https://www.preparednotparanoid.com/pnp-library/mobile-command-intro
References
REI Co-op. How Much Should Your Pack Weigh?
American Academy of Pediatrics. Backpack Safety.
Ready.gov. Make a Plan.
U.S. Fire Administration. Wildfire Evacuation Checklist.
U.S. Geological Survey. Water density and weight.
Disclaimer
This article is for general informational and educational purposes only. It is not medical advice or a substitute for professional emergency planning or training. Carry weight guidelines are starting points, not limits for every person. If you have an injury or medical condition, or haven't been active in a while, talk to your doctor before training with a weighted pack. Affiliate disclosure: I've linked to products from my Amazon store that I personally recommend. As an Amazon Associate, I earn from qualifying purchases, at no extra cost to you. Thank you for supporting my work.
If you are in immediate danger, or officials order an evacuation, call 911 or follow their instructions right away.
Awareness gives you time. Time gives you options.
The prepared protector is someone who's decided that loving someone means being ready for them, not just hoping things go fine.
Prepared Not Paranoid. Protecting the Most Vulnerable Among Us.