Strength Training Foundations Part 4
Bodyweight Exercises, Upper Body and Conditioning
By Larry Betz | Prepared Not Paranoid https://www.preparednotparanoid.com/
In Part 3, we covered six bodyweight exercises for your legs, hips, and core. Now we finish the set. These four exercises build your upper body and get your heart rate up: the push-up, chair or couch dips, jumping jacks, and mountain climbers.
Think about what your arms and shoulders actually do in an emergency. Pushing yourself up off the floor. Carrying a child or a bag of supplies. Pulling a family member to their feet. Pushing a stuck door open. Upper body strength and conditioning aren't about looking good in a mirror. They're about being able to do what needs to be done when it counts.
And like everything in Part 3, you don't need a gym or any equipment. A floor and a sturdy chair or couch are all it takes.
How to Use This Guide
Each exercise has a standard version plus easier and harder variations. Start with the version you can do with good form, and move up only when it feels controlled and solid.
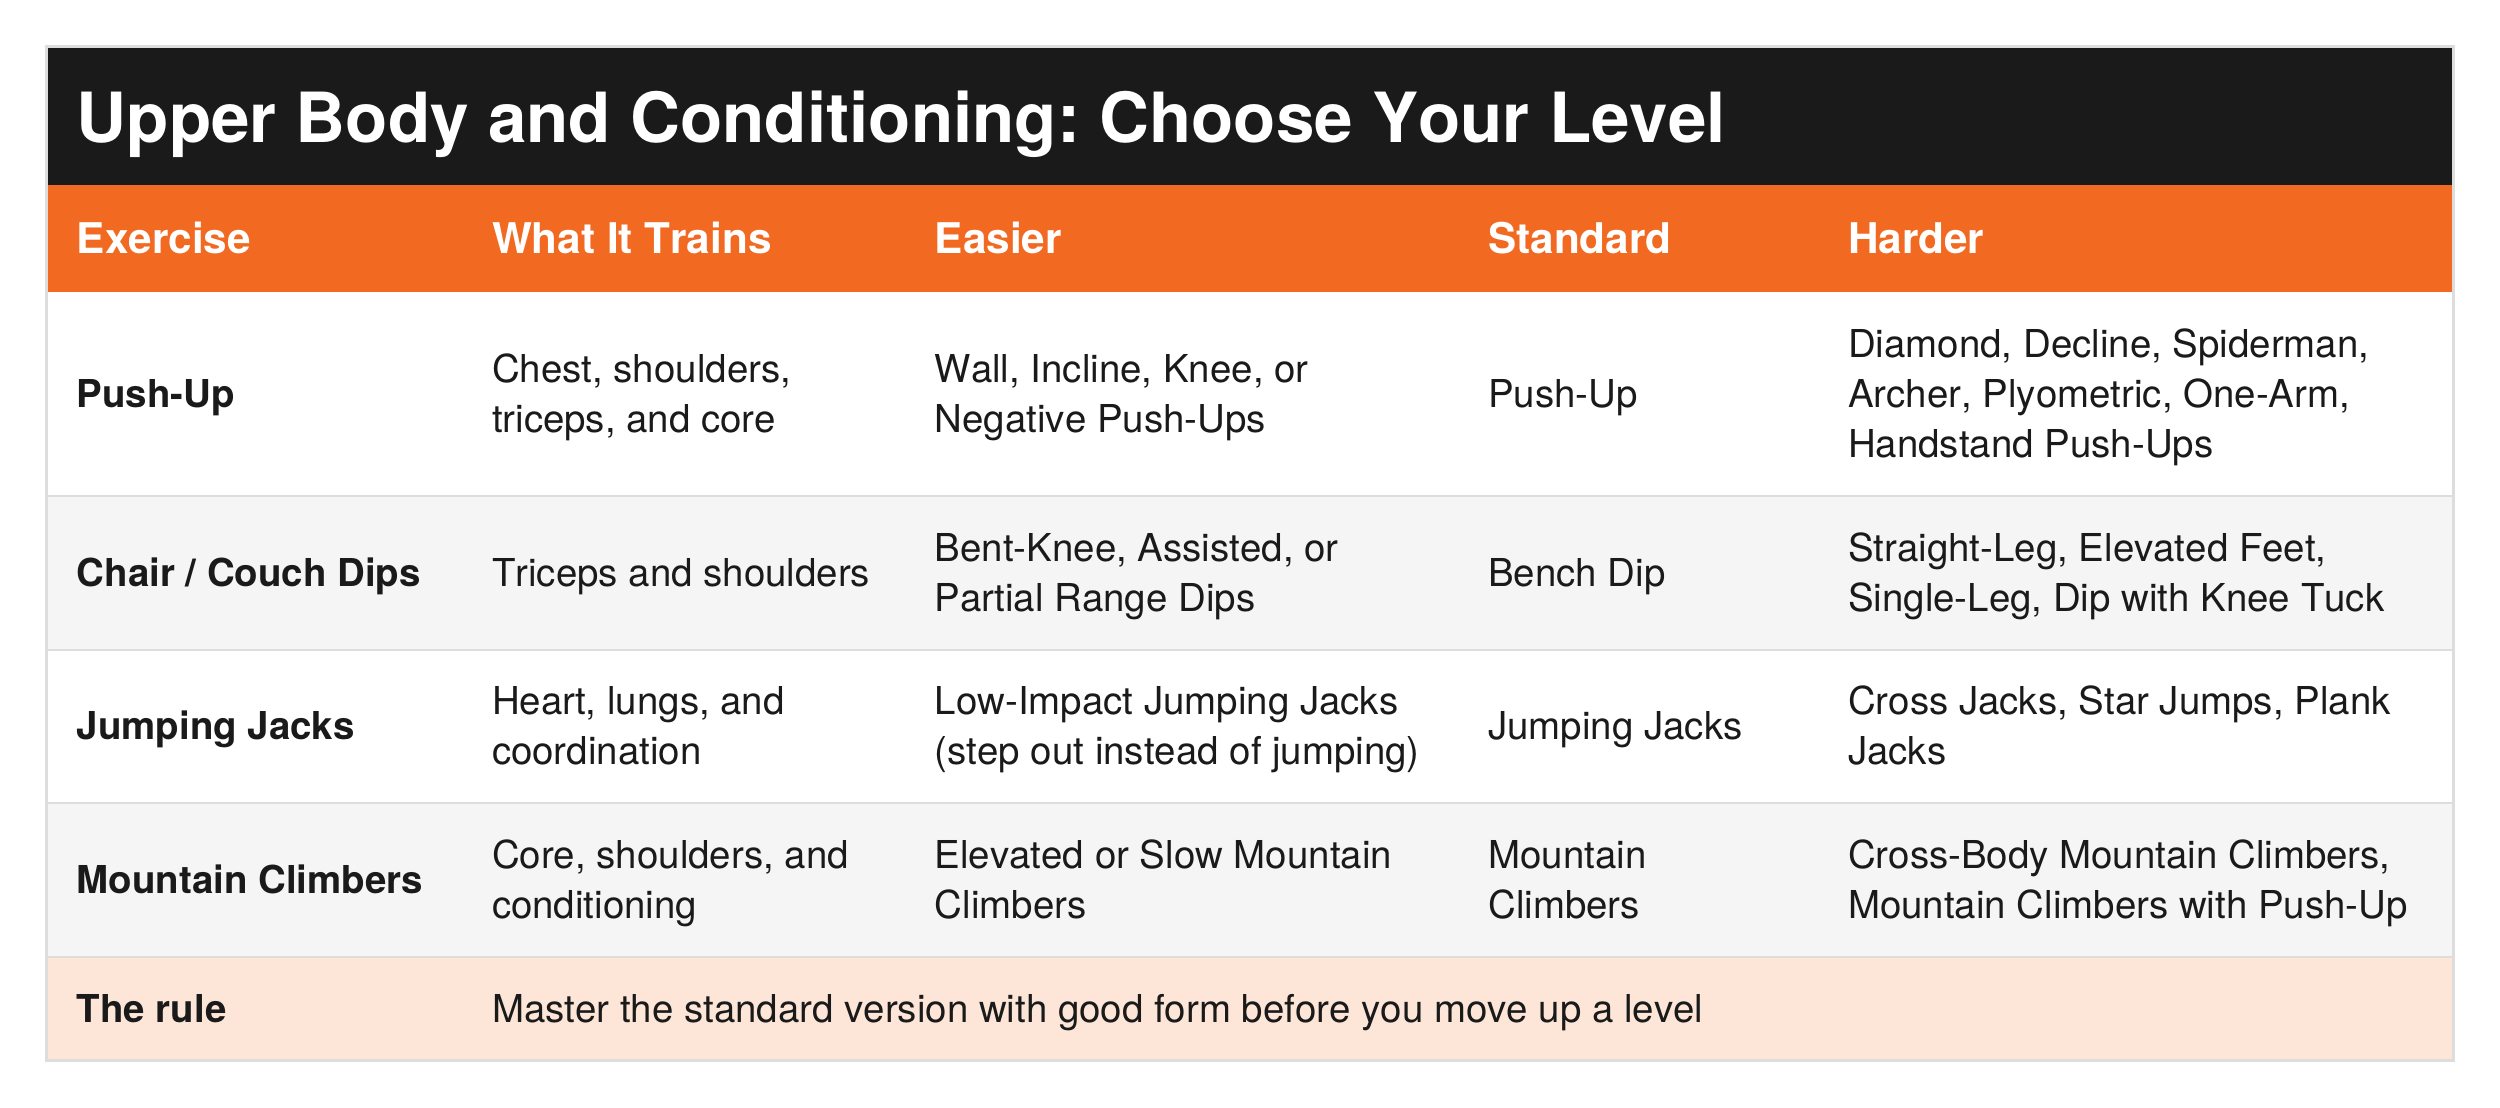
The same rules from Part 2 apply here. Match your reps to your goal, control your tempo, rest with a purpose, and track it all in your Training Log. When you hit the top of your rep range on every set with good form, it's time to move to the next variation.
Before you start: Warm up first. My Dynamic Warm-Up Guide takes you head to toe in about 10 minutes.
Exercise 7: Push-Up
Watch it: https://www.youtube.com/watch?v=zF0jbubK_jU
Starting Position
Hand Placement
Place your hands on the ground slightly wider than shoulder-width apart.
Fingers are spread for better support.
Foot Placement
Extend your legs straight behind you with feet together or slightly apart.
Your toes should be on the ground.
Body Alignment
Keep your body in a straight line from your head to your heels.
Engage your core muscles to maintain a flat back.
Keep your neck in a neutral position by looking at a spot on the floor slightly ahead of you.
Descending Phase
Bend Elbows
Slowly lower your body by bending your elbows.
Keep your elbows tucked close to your body or at a 45-degree angle.
Lower Chest
Lower your body until your chest nearly touches the floor.
Your elbows should be at about a 90-degree angle.
Maintain Alignment
Ensure your body remains in a straight line throughout the movement.
Do not let your hips sag or pike up.
Bottom Position
Chest Close to Floor
Your chest should be hovering just above the floor.
Elbows are bent and close to the sides of your body.
Ascending Phase
Push Through Hands
Push your body up by straightening your elbows.
Maintain a straight body alignment as you lift.
Extend Arms
Fully extend your arms to return to the starting position.
Do not lock your elbows at the top.
Finishing Position
Return to Start
End in the same position as the starting position.
Body remains in a straight line.
Core remains engaged.
Key Points to Remember
Breathing: Inhale as you lower your body, and exhale as you push back up.
Form: Maintain a straight line from head to heels to avoid putting unnecessary strain on your back.
Push-Up Modifications
Easier Push-Up Variations
Knee Push-Ups
Perform the push-up with your knees on the ground instead of your toes.
This reduces the amount of body weight you need to lift, making the exercise easier.
Incline Push-Ups
Place your hands on an elevated surface, like a bench, box, or countertop.
The higher the surface, the easier the push-up.
Wall Push-Ups
Stand a few feet away from a wall and place your hands on the wall at shoulder height.
Perform push-ups against the wall, keeping your body straight.
Negative Push-Ups
Focus on the lowering phase of the push-up.
Lower yourself slowly to the ground, then use your knees or another method to get back to the starting position.
More Challenging Push-Up Variations
Diamond Push-Ups
Place your hands close together under your chest with your thumbs and index fingers forming a diamond shape.
This variation targets your triceps more intensely.
Decline Push-Up
Place your feet on an elevated surface, like a bench or a box.
The higher the elevation, the more challenging the push-up.
Plyometric Push-Ups
Perform a standard push-up but push off the ground explosively at the top, so your hands leave the ground. Clap your hands while in the air for an added challenge.
One-Arm Push-Ups
Spread your feet wider than shoulder-width to maintain balance.
Place one hand behind your back and perform the push-up with the other hand.
Spiderman Push-Ups
As you lower your body, bring one knee to the side toward your elbow.
Alternate sides with each push-up.
Archer Push-Ups
Spread your hands wider than usual.
Lower your body to one side, bending one arm while keeping the other arm straight.
Alternate sides with each push-up.
Handstand Push-Ups
Perform a handstand against a wall.
Lower your head toward the ground and push back up.
This variation primarily targets the shoulders and is very challenging.
Exercise 8: Chair / Couch Dips
Watch it: https://www.youtube.com/watch?v=ejENWRxmo0Q
Standard Bench Dip
Step 1: Starting Position
Sit on the edge of a bench or sturdy chair.
Place your hands on the edge of the bench next to your hips, fingers pointing forward.
Extend your legs out in front of you, keeping your feet together and your heels on the ground.
Slide your hips off the bench, supporting your weight with your hands.
Step 2: Descending
Slowly lower your body by bending your elbows.
Keep your elbows pointing straight back and close to your body.
Lower yourself until your elbows are at about a 90-degree angle.
Step 3: Bottom Position
Your upper arms should be parallel to the ground.
Your shoulders should not dip below your elbows to avoid unnecessary strain.
Step 4: Ascending
Push through your palms to straighten your arms and lift your body back to the starting position.
Keep your core engaged and your body close to the bench.
Step 5: Finishing Position
Return to the starting position with your arms fully extended and your hips just off the edge of the bench.
Regressions (Easier Variations)
Bent-Knee Bench Dips
Perform the dip with your knees bent and feet flat on the ground.
This reduces the amount of body weight you need to lift, making the exercise easier.
Assisted Bench Dips
Place a chair or another bench under your feet.
This will support some of your weight, making the dip easier.
Partial Range of Motion Dips
Lower your body only halfway down instead of going to a full 90-degree angle.
Gradually increase the range of motion as you build strength.
Progressions (More Challenging Variations)
Straight-Leg Bench Dips
Perform the dip with your legs fully extended and your feet together.
Increases the amount of body weight you lift, making it more challenging.
Elevated Feet Bench Dips
Place your feet on another bench, chair, or sturdy surface so that your legs are elevated.
This increases the range of motion and the intensity of the exercise.
Single-Leg Bench Dips
Perform the dip with one leg raised off the ground.
Increases the difficulty by requiring more balance and stability.
Dip with Knee Tuck
As you lower your body, tuck your knees toward your chest.
Straighten your legs as you push back up.
Adds an extra core challenge to the exercise.
Tips for Proper Execution
Breathing: Inhale as you lower your body, and exhale as you push back up.
Form: Keep your back close to the bench, and avoid letting your shoulders hunch or your elbows flare out to the sides.
Control: Perform the movement in a controlled manner to maximize muscle engagement and minimize injury risk.
By incorporating these regressions and progressions into your workout routine, you can tailor the bench dip to your current fitness level and gradually increase the challenge as your strength and technique improve.
Exercise 9: Jumping Jacks
Watch it: https://www.youtube.com/watch?v=nGaXj3kkmrU
Starting Position
Stand Tall
Stand upright with your feet together and your arms resting at your sides.
Keep your shoulders relaxed and look straight ahead.
Movement
Jump and Spread
Simultaneously jump your feet out to the sides while raising your arms above your head.
Your feet should land shoulder-width apart or wider, and your hands should meet or come close to meeting above your head.
Ensure your knees are slightly bent to absorb the impact.
Return to Start
Quickly reverse the movement by jumping your feet back together while lowering your arms to your sides.
Land softly on the balls of your feet, returning to the starting position.
Breathing
Inhale: As you jump your feet out and raise your arms.
Exhale: As you bring your feet together and lower your arms.
Form Tips
Core Engagement
Keep your core muscles engaged throughout the movement to maintain stability and support your lower back.
Controlled Movements
Perform the exercise in a controlled manner to avoid injury and maximize effectiveness.
Avoid letting your arms or legs flail; keep the motion smooth and deliberate.
Foot Placement
Land softly on the balls of your feet with each jump to reduce impact on your joints.
Arm Movement
Raise your arms fully to meet above your head, but avoid locking your elbows.
Lower your arms back to your sides in a controlled motion.
Modifications and Variations
Low-Impact Jumping Jacks
Instead of jumping, step one foot out to the side while raising your arms, then return to the starting position and repeat on the other side.
This reduces the impact on your joints while still providing a cardio workout.
Cross Jacks
Cross your feet in front of each other as you jump out and in.
Alternate which foot crosses in front with each jump.
For added difficulty, you can also cross your arms in front of your chest when you cross your feet.
Star Jumps
Begin in a squatting position with your feet together and hands touching your toes.
Explosively jump up, spreading your arms and legs out into a star shape.
Land softly and return to the squatting position.Plank Jacks
Start in a plank position with your hands directly under your shoulders and your body in a straight line.
Jump your feet out to the sides and then back together, similar to a traditional jumping jack motion, while maintaining the plank position.
Benefits of Jumping Jacks
Cardiovascular Health: They increase your heart rate and improve cardiovascular endurance.
Full-Body Workout: They engage multiple muscle groups, including the legs, core, and upper body.
Coordination and Agility: They help improve coordination and agility through the rhythmic movement.
Calorie Burning: They are effective for burning calories and can be included in high-intensity interval training (HIIT) workouts.
Jumping jacks are a versatile and effective exercise that can be easily incorporated into any workout routine for a quick cardio boost and full-body engagement.
Exercise 10: Mountain Climbers
Watch it: https://www.youtube.com/watch?v=gW-q50V6Z_0
Starting Position:
Start in a high plank position with your hands directly under your shoulders, your body forming a straight line from head to heels.
Engage your core, keep your back flat, and look down at the floor.
Execution:
Drive your right knee towards your chest, keeping your foot off the ground.
Quickly switch legs, driving your left knee towards your chest while extending your right leg back to the starting position.
Continue alternating legs in a running motion, maintaining a steady pace.
Regression: Elevated Mountain Climber
For those needing a less challenging version of the Mountain Climber:
Step 1: Starting Position
Place your hands on an elevated surface like a bench or step, with your body in a plank position.
Ensure your hands are directly under your shoulders, and your body forms a straight line from head to heels.
Step 2: Execution
Drive your right knee towards your chest, keeping your foot off the ground.
Quickly switch legs, driving your left knee towards your chest while extending your right leg back to the starting position.
Continue alternating legs, maintaining a steady pace.
Regression: Slow Mountain Climber
For those needing a gentler introduction to the movement:
Step 1: Starting Position
Start in a high plank position with your hands directly under your shoulders and your body in a straight line.
Step 2: Execution
Slowly drive your right knee towards your chest, keeping your foot off the ground.
Return your right leg to the starting position.
Repeat the movement with your left knee.
Continue alternating legs at a slow, controlled pace.
Progression: Cross-Body Mountain Climber
For those seeking a more challenging version of the Mountain Climber:
Step 1: Starting Position
Start in a high plank position with your hands directly under your shoulders and your body in a straight line.
Step 2: Execution
Drive your right knee towards your left elbow, engaging your obliques.
Quickly switch legs, driving your left knee towards your right elbow while extending your right leg back to the starting position.
Continue alternating legs in a running motion, maintaining a steady pace and focusing on engaging your core.
Progression: Mountain Climber with Push-Up
For those seeking an even more advanced challenge:
Step 1: Starting Position
Start in a high plank position with your hands directly under your shoulders and your body in a straight line.
Step 2: Execution
Perform a push-up by lowering your chest towards the ground and then pressing back up to the plank position.
Immediately after the push-up, drive your right knee towards your chest.
Quickly switch legs, driving your left knee towards your chest while extending your right leg back to the starting position.
Continue alternating legs for a few repetitions, then perform another push-up.
Alternate between push-ups and mountain climbers.
Putting It All Together: The Anywhere Bodyweight Workout
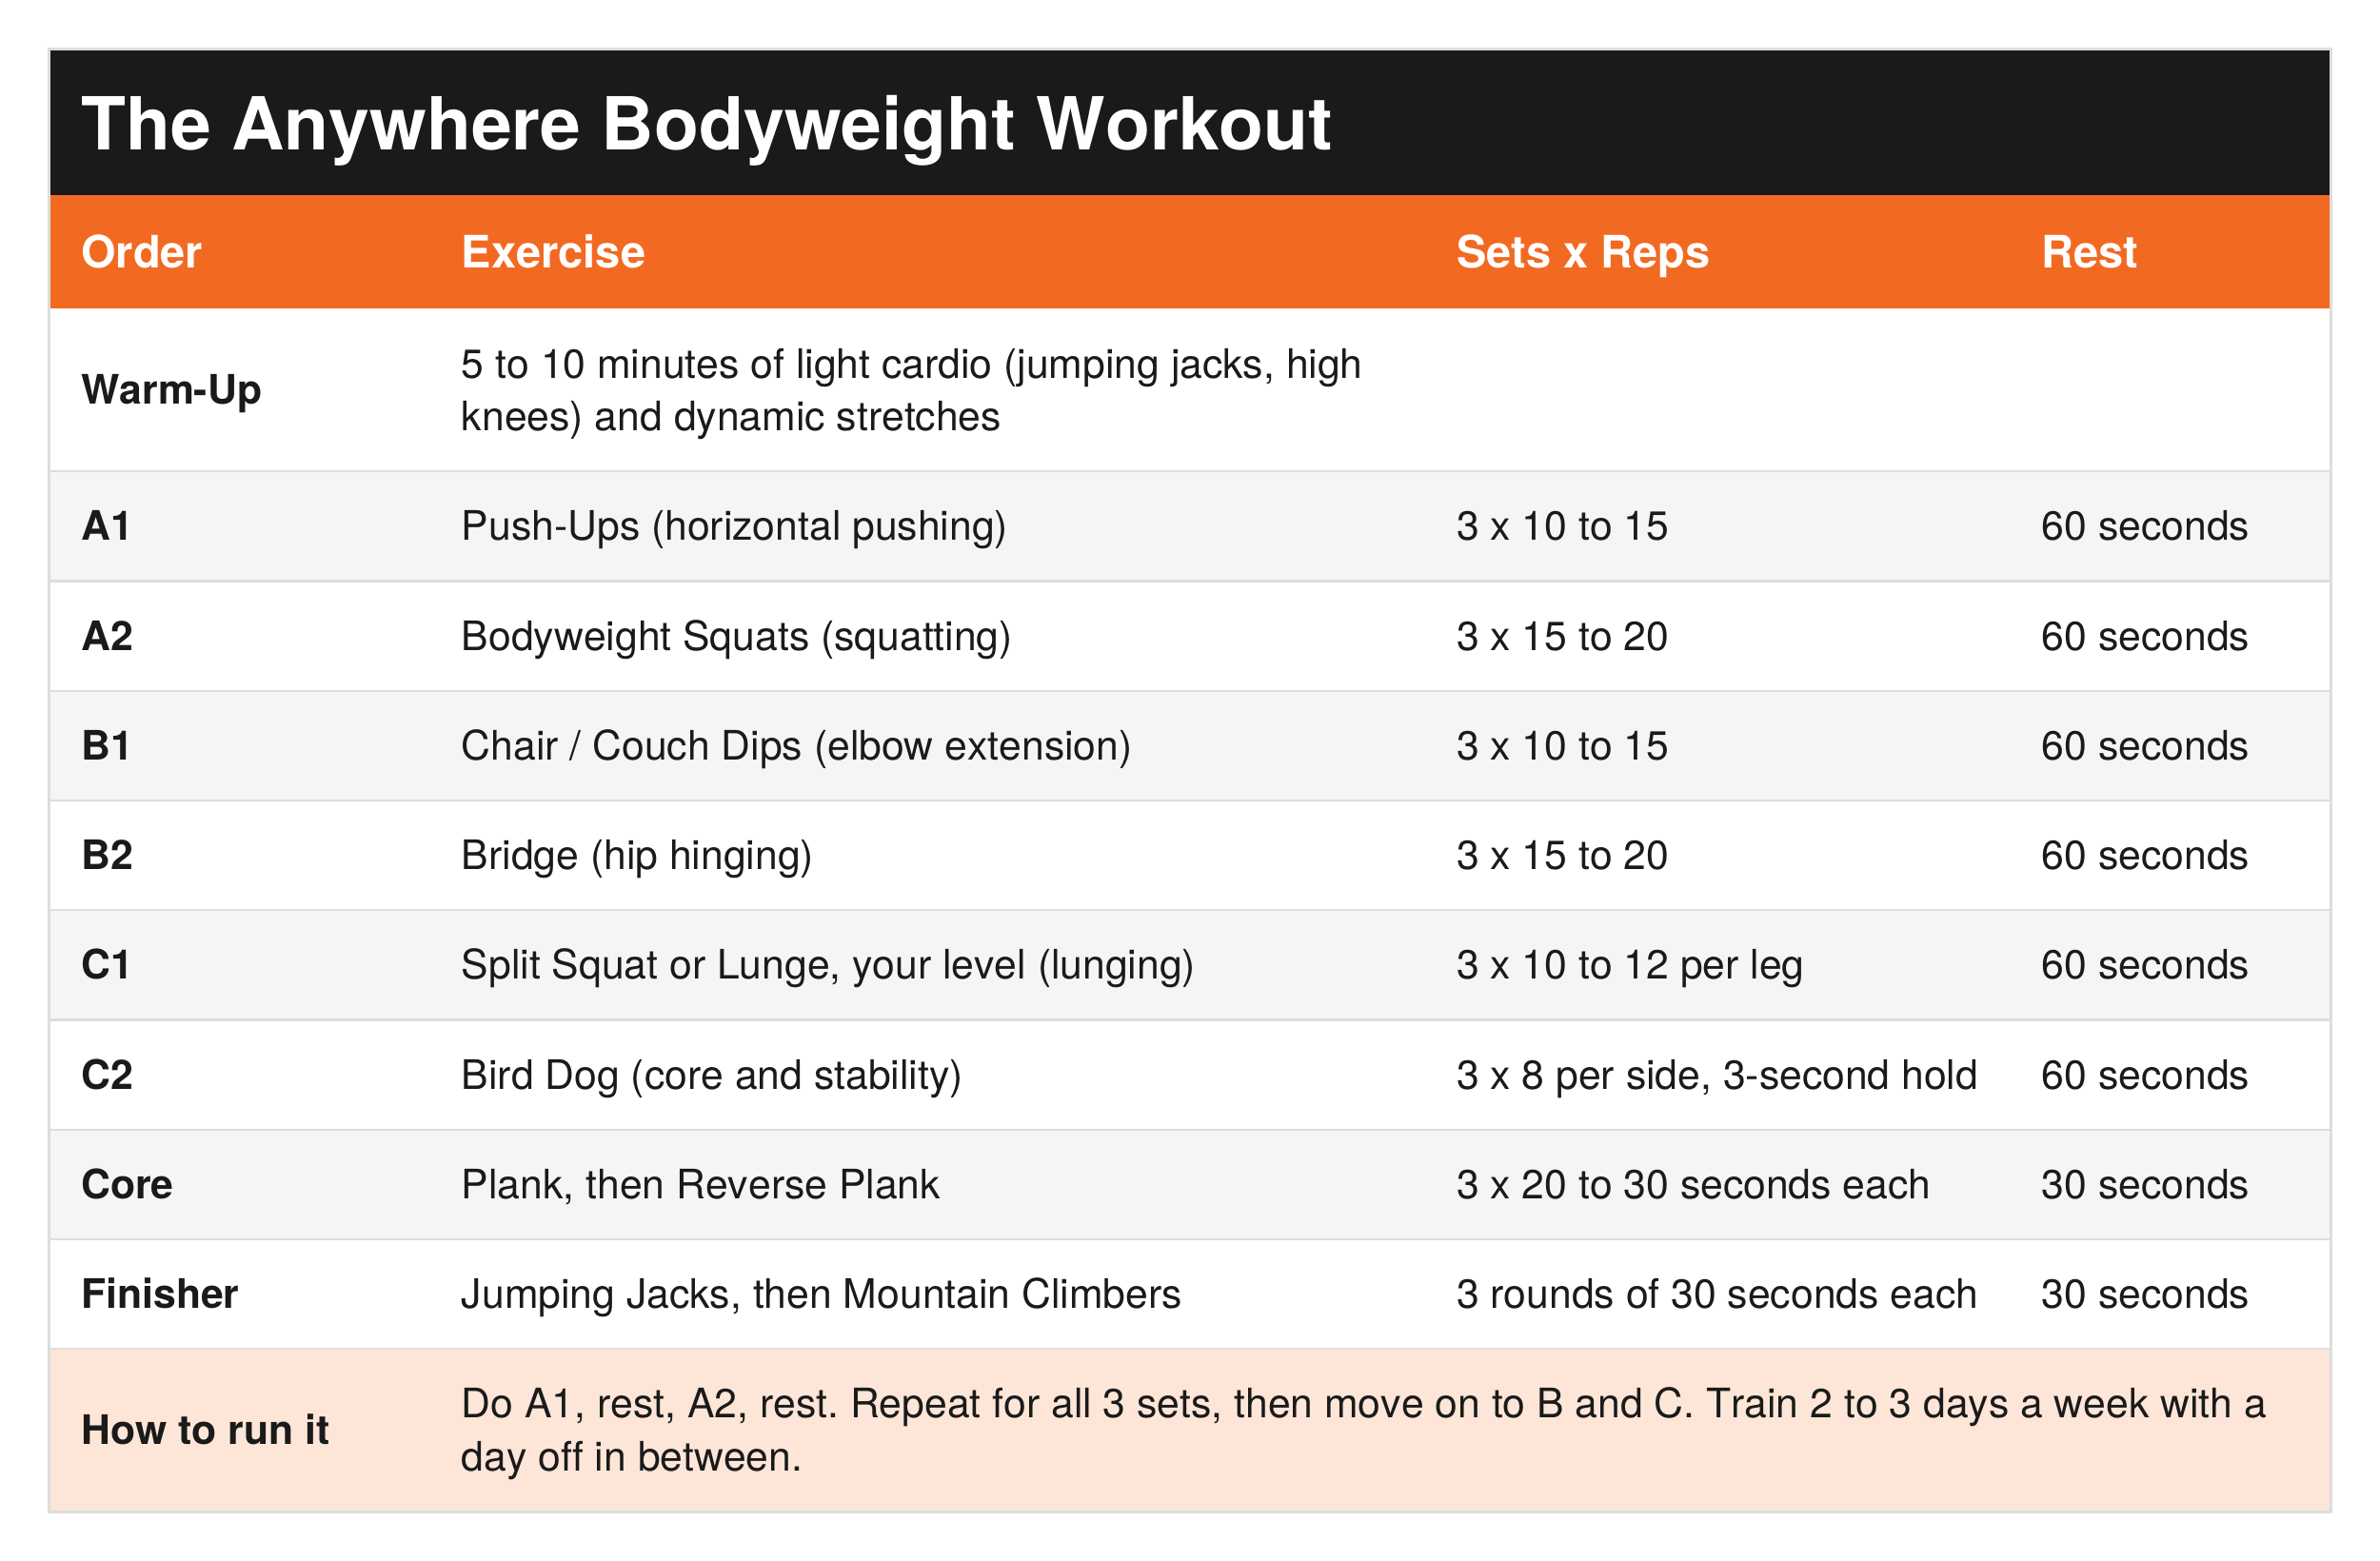
Here's a simple full-body workout that uses all ten exercises from Parts 3 and 4. It's built the same way I've built programs for clients for over 20 years.
Agonist and Antagonist Training
The simplest way to have a balanced workout is to use agonist antagonists while not duplicating movement patterns.
Pairing agonist and antagonist exercises in a workout ensures balanced muscle development, enhances joint stability, and reduces the risk of injury. This method involves alternating between exercises that target opposing muscle groups, such as a bench press (agonist) paired with a bent row (antagonist). Training with this approach 2 to 3 times per week helps improve strength across various movement patterns. By working these muscles in tandem, you promote even strength distribution and prevent muscular imbalances. For most people, this is an efficient way to pair exercises. Additionally, this approach allows one muscle group to rest while the other is working, leading to a more efficient and effective workout.
The Basic Movement Patterns
Next are the basic movement patterns that can be followed to have a balanced workout. If you perform these patterns and their variations, you will most likely be getting a balanced workout.
Squatting: This movement involves bending at the hips, knees, and ankles to lower the body, then returning to a standing position. It primarily targets the quadriceps, hamstrings, glutes, and core.
Lunging: Lunges involve stepping forward, backward, or sideways and lowering the hips until both knees are bent at about a 90-degree angle. This exercise engages the quadriceps, hamstrings, glutes, and calves, as well as improving balance and coordination.
Hip Hinging: This pattern involves bending at the hips while keeping the spine neutral, such as in a deadlift. It targets the posterior chain, including the glutes, hamstrings, and lower back.
Knee Flexion: Movements such as leg curls, where the heel is brought toward the glutes, primarily target the hamstrings, working to improve strength and stability in the back of the thigh.
Knee Extension: Exercises like leg extensions, where the leg is straightened at the knee, primarily engage the quadriceps, strengthening the muscles in the front of the thigh.
Vertical Pulling: Movements like pull-ups and lat pulldowns, where you pull a weight downward or your body upward, work the latissimus dorsi, biceps, and upper back muscles.
Vertical Pressing: Pressing a weight overhead, such as in shoulder presses, targets the deltoids, triceps, and upper chest, improving shoulder strength and stability.
Horizontal Pulling: Exercises like rows, where you pull a weight toward your torso, focus on the rhomboids, trapezius, and biceps, enhancing back strength and posture.
Horizontal Pressing: Pressing movements like push-ups and bench presses involve pushing a weight away from the torso horizontally, working the pectorals, triceps, and anterior deltoids.
Elbow Flexion: Bicep curls and similar movements that involve bending the elbow to bring the hand toward the shoulder target the biceps brachii and brachialis muscles.
Elbow Extension: Tricep extensions and similar movements involve straightening the elbow to move the hand away from the shoulder, primarily working the triceps brachii.
Trunk Rotation: Movements like Russian twists or woodchoppers involve rotating the torso, engaging the obliques, rectus abdominis, and transverse abdominis to improve core strength and stability.
The Workout
Here's how those principles come together with the ten exercises you just learned. Each pair works opposing muscle groups or different movement patterns, so one area rests while the other works. Pick the level of each exercise that fits you right now.
Write it in your Training Log every time. When you can hit the top of the rep range on every set with good form, move that exercise up to its next variation.
These preceding exercises are a great place to start. If you are looking to add in a piece of equipment at this point, my recommendation would be some form of pull-up bar. This will allow you to add in a variety of exercises.
See It in Action
Want to see each of these exercises demonstrated? Check out the videos below. Each one walks you through proper form, so you can watch it once before you try it yourself.
| See It in Action: Upper Body and Conditioning Demonstrations | |||
|---|---|---|---|
| # | Exercise | Video | Link |
| 7 | Push-Up | How To Do A Push-Up: Proper Form and Technique | Watch ▶ |
| 8 | Chair / Couch Dips | How to Do Chair Dips Properly | Watch ▶ |
| 9 | Jumping Jacks | How to Do Jumping Jacks Properly | Watch ▶ |
| 10 | Mountain Climbers | Mountain Climbers: How To (3 steps to proper form) | Watch ▶ |
| Tip | Watch the full video once before you try the exercise, then start with the easier version if you need it. | ||
Ask Yourself
Could I push myself up off the floor, or help someone else up, without struggling?
Am I choosing the version I can do well, or the one that looks impressive?
Do I have a workout I could do tomorrow in a hotel room with no equipment?
Remember
Strength you can use anywhere is strength you'll have when it matters. Ten exercises, a floor, and a chair are all it takes. Start where you are, write it down, and keep moving up.
Go Deeper
Free download: Dynamic Warm-Up Guide. The 16-move, head-to-toe warm-up I recommend before every session. [Get it here: LINK TO WARM-UP GUIDE]
Free download: The Prepared Not Paranoid Training Log. Write in the Anywhere Bodyweight Workout and track every set, rep, and progression. [Get it here: LINK TO TRAINING LOG]
[PREMIUM PRODUCT: COMING SOON]
Tools I recommend: You'll find the pull-up bar, exercise mats, and home training gear I recommend in my Amazon store. [AMAZON STORE LINK]
Related reading:
Strength Training Foundations, Part 2: Strength Training Basics [LINK]
Strength Training Foundations, Part 3: Bodyweight Exercises, Lower Body and Core [LINK]
Aerobic Fitness: An Introduction [LINK]
Home Gym Equipment [LINK]
References
Haff, G. G., & Triplett, N. T. (Eds.). (2016). Essentials of Strength Training and Conditioning (4th ed.). National Strength and Conditioning Association. Human Kinetics.
U.S. Department of Health and Human Services. (2018). Physical Activity Guidelines for Americans, 2nd edition. https://health.gov/our-work/nutrition-physical-activity/physical-activity-guidelines/current-guidelines
Disclaimer
This article is for general informational and educational purposes only. It is not medical advice and is not a substitute for guidance from your physician. Exercise carries a risk of injury. Talk to your doctor before starting any new exercise program, especially if you have a medical condition, past injuries, or have been inactive. Stop any activity that causes pain, dizziness, or chest discomfort. Affiliate disclosure: I've linked to products from my Amazon store that I personally recommend. If you purchase through these links, I may earn a small commission at no extra cost to you. Thank you for supporting my work.
If you have chest pain, severe shortness of breath, or feel faint during exercise, stop and call 911.
Awareness gives you time. Time gives you options.
The prepared protector is someone who's decided that loving someone means being ready for them, not just hoping things go fine.
Prepared Not Paranoid. Protecting the Most Vulnerable Among Us.